|
This is a very multifaceted hobby and there are a dazling array
of supplies (e.g. tools and adhesives) that can be useful for
assembly, conversion, terrain making, etc. I will try to sort
them by categories. One online vendor of hobby supplies is: MicroMark.
If you know of more, contact me via my questions/comments
form. Also check out my Hobby
Materials Page.
Table of Contents
Chopper, The
|
The Chopper is a very handy little cutting device.
It mounts a single razor blade on a metal arm. The
cutting motion ends up being somewhat Guillotine-like,
allowing for clean cuts.
It is great for thin styrene material, especially
if it is solid. Magnetic strips also cut reasonably
well, provided they are placed in the chopper with
the paper backing facing up.
There are two guides with the Chopper that facilitate
reproducible cuts at 30, 45, 60, and 90 degrees.
|
|
|
Clamps
Here are a variety of clamps that I find useful. The workhorse
in my model work are the blue plastic X-acto bar clamps.
 |
Top left - X-acto c-clamps (metal)
Top right - X-acto bar clamps (plastic)
Bottom left - metal vise
Bottom right - hemostats |
|
Cutters/Clippers/Shears/Snippers
Here are a variety of clamps that I find useful. The workhorse
in my model work are the blue plastic X-acto bar clamps.
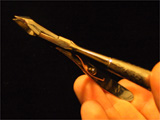
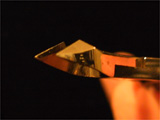
Cuticle clippers
- you can find these around the house
- sturdy and able to get into tight spaces
|
|
Xcelite 64CG
102 mm Cutters
Angled tip
(underside is hollowed) |
|
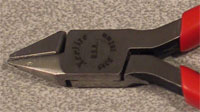
Xuron Microshears
Better at flush cuts
- this is the best sprue cutter I have used
- to protect it, I do not use it for anything else |
|
|
Cyanoacrylate Glue, a.k.a. Superglue,
Krazy Glue, etc. ($1; everywhere)
BE CAREFUL! This is fast bonding adhesive. It does not
fill gaps very well, but it bonds strongly and it bonds
different materials well reasonably well. If you have large
gaps between the pieces, you might consider epoxy resin
putty.
Warning: Fingers bond fastest. Your fingers will
stick together long before your parts do, if you feel tackiness,
pull away fast or you will be in an awkward position.
|
Drills & Rotary Tools
Of all of the following tools, the portable Makita handheld
power drill is the most indispensable.
If I lost my pin vise and Dremel tomorrow, I could continue
to use my Makita for all of the applications I have used
drills for with miniatures
| Dremel
Tool - A reuptedly handy little hobby gadget,
this is a high RPM rotary tool. It can be used
as a drill, cutter, polishier, cleaner, sander,
and a whole host of other functions. I have actually
found it to be far less useful than I had hoped.
Accessories I have found useful for miniatures
applications are the Dremel
Tool Drill Press (which also doubles as a convenient
stand), Dremel Tool
Flexshaft Attachement (this long snaky black attachment
allows more precise drilling), more collets (I
simply bought all four to be safe). Bit breakage
is a significant problem with this tool. If I were
to do it again, I would buy the variable speed
version that can operate below 1,000 RPM or simply
not buy it at all and use my Makita power drill. |
 |
|
Pin
Vise ($5-$7) - Although I literally do use
it as a pin vise now, the name is a little misleading
and/or confusing to newcomers to the hobby. This
is a small metal handle that is almost exclusively
used as a manual drill in the miniatures hobby.
Simply slip a fine drill bit into it and tighten
down on the collet, just like a drill. It can
also be used to hold pins, if you like, which
is handy for marking a spot for drilling. This
tool takes the most time to use, trading speed
for control and feedback. Currently, I generally
only use my pin vise to hold the tip of a stick
pin for marking pilot spots on miniatures for
drilling.
Note: the dismantled vise
pictured at right shows that the collets are contained
within the body of the vise and that there are
four collet sizes to choose from.
Tip: check to make sure that
the butt of the vise (the hexagonal knob) rotates
freely before buying it. You should be able to
brace that with the palm/butt of your hand while
rotating the vise with your fingers.
|
 |
| Power
Drill ($50+) - It has a variable speed trigger,
so I can control the speed quite nicely by squeezing
more or less on the trigger. The mass of the drill and
its speed makes it a little more stable than a pin vise
for pinning and the
lower speeds make it a lot safer than a Dremel Multipro. |
 |
|
Drill Bits
Even if you have the set for the Dremel tool, you will
want a good selection of pin drill bits. Specifically:
- 0.030" - 0.032" for the pinning
I describe with paper clips.
|
Helping Hands ($6; an electronics supply
store, or a well-stocked hobby store)
These are cool and useful only occasionally, but when they
are, you really want to have them. They consist of a reasonably
heavy base on which a rod is mounted via a pivot. At each
end of the rod are additional pivots with alligator clips.
The base is not that fantastic of an anchor/ballast, but
it's OK; it will work, but keep in mind that you can easily
jar it during use.
|
|
Invaluable and nigh magical tools for cutting foam. :)
Seriously, your capabilities for shaping foam are tremendously
different given hot wire tools of various types. There are
simple scroll cutters, scroll tables, engravers, knifes,
etc. Here's a picture of a scroll table, which is hands
down one of the coolest tools (also in the picture is a
set of stairs I created by trimming the corner edges of
the blocks pictured in the back of the image.
Foamlinx is a little different as they provide CNC machines for foam cutting - basically, they can cut a computer-generated design out of foam automagically. Maybe a little high-end for a hobbyist, but hey, who knows? I have no direct experience with Foamlinx equipment, so I can not render an opinion on their functionality.
|
Knife - see the type of knife, e.g. Xacto
knife.
|
|
|
Needle File
Small thin files that are essential to thorough cleanup
of flash on models and minis. These are not all the same
in size. Testors's Model Masters series needle files are
quite fine and small. I would recommend buying a "normal"
size set as well as the Model Masters set. They have their
different uses.
|
Plastic Cement/Glue
A generic term that usually refers to a cement used to
bond styrene surfaces. It is variously called Plastic Glue,
Polystyrene Cement, Plastic Cement, etc. I currently use
three bottles of plastic cement - Faller Expert Plastic
Cement, Citadel Miniatures Plastic Cement, and Tenax Cement.
Tenax Cement ($3, 1 fluid ounce,
hobby store) - a.k.a., "Tenax-7R Space Age Plastic
Welder, Super Fast-Dry Formula." I primarily use Tenax
Cement for quick flash removal.
It is the thinnest and quickest drying of the plastic cements
I own. It claims to be a strong and fast-drying glue, but
I honestly have not taken advantage of it as a cement.
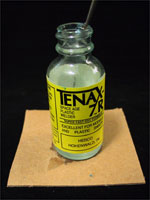
| A picture
of Tenax-7R Space Age Plastic Welder (I love saying
that every time). Notice the cardboard square I superglued
to the base. This is a safety measure to avoid tipping
the bottle over, which can happen suprisingly easily
and frequently when you get into some high speed flash
removal. Also be aware that Tenax evaporates quite quickly.
You should have a reasonably well ventilated workspace
and you should buy a replacement bottle when your current
one is about a quarter full. I personally move on to
the next bottle when it is about 5-10% full as there
is a slurry of flash and cement by that time. |
 |
Faller Expert Plastic Cement ($4.50,
1 fluid ounce, hobby store) - Faller Expert Plastic
Cement is my favorite for plastic bonding. Currently, I
only use my Faller Expert Plastic Cement for precision application
of glue missed when I did the bulk of the glue application
with Citadel cement. I am very happy with Faller and the
precision applicator is not only great because of its precision
but also because it does not clog.
Citadel - I bought the Citadel Minatures Polystyrene
Cement when I first received my first Warhammer 40k army
because I did not know the cement types very well and I
felt most comfortable buying what was made by the company
that made my plastic miniatures; I will probably just us
it until it is empty and then use just Faller. Clogging
is a problem with this cement. I have to keep a sewing pin
in the tip to keep it clear for use. The opening is large
enough that it is awkard to apply cement sometimes and more
than once I ended up with a lot more cement than I wanted.
Residue accumulates easily and heavily on the tip, which
makes for some stray application that is unwanted.
|
Saws
Hack Saw
I keep a tiny little hack saw around for cutting materials
too sturdy for my Hobby saw. It's not vital, but it is handy
and not that expensive.
Hobby saw w/ mitre box
This is a very handy tool. It's not just good for cutting
bass wood and balsa wood. It is also great for cutting styrene,
especially large diameter tubes that would deform from typical
styrene cutting methods.
Jeweler Saw
This is great for conversions. It allos fine precise cuts.
The blade is delicate though, so be careful.
|
Seam Scraper ($10)
This is a cool little gadget made by Squadron Supplies.
It is a double-ended tool made of metal that simply has
curved scraper ends. This allows flash to be scraped off
with smooth strokes and the angle of the scraper does not
allow it to catch and gouge, because the edge pulled along
the surface. The effect is a tool that very quickly, cleanly,
and safely cleans flash off of smooth long surfaces. It
can also be used to whittle/sculpt down a surface somewhat.
|
Stylus ($2)
This is a tool for sculpting that has a round ball shape
at the end.
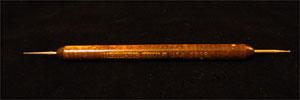 |
| This is my
double ball stylus. The smaller ball is 0.030"
in diameter, the larger one is 0.045" in diameterOne
ball is smaller than the other onea fine tip, the other
is a little larger. I find it very useful. |
|
|
|
Florist Wire ($?; craft store)
This is a reasonably stiff wire that is still somewhat
malleable. It can be used to help hold things in place
and/or add structural integrity to something. Florists
use it for constructing displays.
|
Xacto Knife ($2-$15, hobby or crafts
store, general purpose shops)
You have to get at least one of these. This is the standard
hobby knife. It is typically used with a triangular blade
(#2 blade?). There are two primary blade choices. A sturdy
thick triangular blade or a thinner, longer, finer triangular
blade (#11 blade). The former is great for most work, while
the later is nice for working in tight spaces or times when
you want the blade to flex a little. If you are planning
to put a lot of twisting force on the blade, you should
probably use the heavier blade and wear some protective
glasses so that if the tip snaps off, you won't damage your
eyes. I personally have a few knives. I always keep one
standard knife with a standard tip handy as well as a slimmer
gripped fine tip knife. Changing the blades out gets annoying
and the different grip sizes really are well suited to their
use.
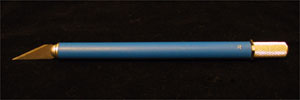 |
| This is the
Xacto I use most. It has a nice soft grip, a sharp #11
blade, and the back end has a hexagonal washer/cuff
around it which prevents it from rolling around (safety
first!). |
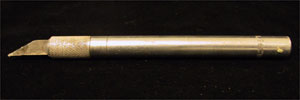 |
| And here is
my uglier knife <grin> the one that keep around
to assist in removing pieces from assembled models and
heavy knife work. |
|
|