|
In many hobbies, joining two pieces together is necessary. The
best way to do that is not as simple as it seems. When dealing
with small objects, special materials, mismatched materials, and
special needs (e.g. a seamless joint), joining things becomes
more difficult. Sometimes, an adhesive is not adequate and pinning
is required.
Joining Overview
ALL OF THE FOLLOWING INFORMATION IS AT YOUR OWN RISK. BE CAREFUL.
| Part 1 |
Part 2 |
Recommended Adhesives (From strongest to weakest bond) |
| Styrene |
Foam |
Foam glue |
| Styrene |
Metal |
Epoxy or CA glue* |
| Styrene |
Styrene |
Plastic cement |
| Metal |
Foam |
Foam glue, low-temp hot glue |
| Metal |
Metal |
Epoxy, CA glue* |
| Metal |
Styrene |
Epoxy, CA glue* |
| Foam |
Foam |
Foam glue, low-temp hot glue, or epoxy |
* - best if you want to be able to break the joint later
Glues/Adhesives
There are many glues to choose from and they all have their advantages
and disadvantages. If you know of more, contact me via my questions/comments
form.
First, some tips to gluing happiness
- Dropcloth - don't be silly, you aren't omnipotent (if you
are, just use your divine power to join pieces). You will eventually
spill glue. I like to use a few layers of scratch paper or a
piece of plasticore (old discarded
election day signs work great). Be sure your glue will not soak
through to something important.
- Clean surfaces - this is a very important point. If the glue
only sees dirt, that's what will be glued together. Clean the
surfaces with a toothbrush, soap, and water.
- Test the future joint - connect the pieces and make sure the
joint is ready to go before you apply glue.
- Assemble everything before the glue is pouring - if you need
a mixing stick or applicator, grab it ahead of time. If you
will need something to support or clamp together the parts,
get it before you start gluing. If you run around with half-glued
parts frantically looking for a clamp
or helping hands, you will probably
regret it.
Cyanoacrylate Glue, a.k.a. Superglue,
Krazy Glue, etc. ($1; everywhere)
BE CAREFUL! This is a fast bonding adhesive that is not
as strong as many folks believe. In fact, I usually recommend
it for applications in which you want to be able to controllably
break a joint later.
- Ideal bonding surface: two perfectly matched, smooth
surfaces.
- Setting time: seconds
- Curing time: minutes
- Clean-up: acetone or any of the brand name solvents
for CA glue (Warning: this may damage plastic/foam)
- Breaking the bond: sometimes you can carefully just
twist the pieces apart. If the parts are resistant to
acetone, you could soak it in acetone. Be careful, many
forms of plastic and foam are often damaged quickly by
acetone.
It does not fill gaps very well, but it bonds strongly
and it bonds different materials well reasonably well, provided
the pieces meet well. If you have large gaps between the
pieces, you might consider epoxy adhesive or epoxy resin
putty.
Warning: Skin bonds quickly to skin because the
surfaces meet well and they are moist. Your fingers will
stick together long before your parts do, if you feel tackiness,
pull away fast or you may be in an awkward position. You
should generally make an effort to keep CA glue off of your
skin.
|
Epoxy Adhesive ($5 for about 8 oz.;
everywhere)
This is generally my favorite choice for a good strong
bond between two pieces; the exceptions would be plastic-plastic,
for which I recommend plastic cement, and foam-foam, for
which I recommend foam glue as it is cheaper and cleaner
to use.
- Ideal bonding surface: two rough surfaces, reasonably
well met (still bonds well to smooth surfaces)
- Setting time: minutes
- Curing time: initial cure in one hour, full cure in
24 hours
- Clean-up: soap and water work (possibly with a scrubbing
brush) reasonably well, but once the epoxy had hardened,
it's a done deal.
- Breaking the bond: generally, this is not a good idea,
as parts will break before the epoxy does. However, if
the surfaces joined are very smooth, such as a washer
joined to the bottom of a base, it may be possible to
pry them apart. Then you can carefully scrape off the
epoxy.
Warning: this stuff can get messy.
I prefer the separate bottles over the syringe dispensers
- Syringes are less accurate, and thus waste more epoxy
- I have found that, ironically, syringe dispensers are
often far from accurate in dispensing equal amounts of
epoxy, whereas the squeeze bottles can be used quite easily
to dispense accurate amounts. This is especially problematic
with the small amounts of epoxy you often use when assembling
miniatures. Note: under ideal circumstances, with an experienced
user, plenty of time, and well-maintained syringe, this
may not be the case, but in practical application this
problem exists.
- Syringes have less epoxy - There is about a fourfold
difference in the amount of epoxy in a syringe vs. bottles,
in many cases. Combined with the increased waste, this
can easily become an order of magnitude more expensive.
- Syringes are more prone to unwanted mixing - The nozzles
of an epoxy syringe are side-by-side and generally capped
off by a single cap. This leads to a much greater incidence
of unwanted mixing of the components, which can lead to
completely sealing a syringe nozzle or clogging it partially,
resulting in the total loss of the syringe or an exacerbation
of the unequal mixing problem.
Which brand (I'll include only the recent ones that I
remember)?
- Loctite - I only tried the syringe and it was the worst
I have tried. I did not like it one bit. I used it up
at a remarkable rate. The epoxy worked fine, though.
- Devcon - epoxy works well, and I like the bottles. I
tried their syringe once and although I dislike syringes,
this one performed the best out of the three or four I
have tried over the years.
|
Foam Glues
There are a variety of white glues. Foam glues are very
thick and take a while to set, but they are quite durable.
Two examples are Aleene's Foamtastic (US$3 for 4 oz; Hobby
Lobby) and Woodland Scenics Subterrain Foam Tack Glue (US$10
for 12 oz; train and hobby stores). I have found both of
these to work well, but the Subterrain works slightly better.
Either is a good buy and I would not go out of my way to
find Subterrain if Aleene's was the only readily available
glue.
- Ideal bonding surface: two rough surfaces, reasonably
well met (still bonds well to smooth surfaces)
- Setting time: minutes
- Curing time: initial cure in about an hour, full cure
in 24 hours
- Clean-up: water!
- Breaking the bond: My recommendation
is don't. This stuff is actually quite strong once bonded.
You will probably break the foam first. If you really
have to break the pieces apart, I suggest using a shim
to wedge between the pieces so that you might tear away
only a superficial layer of foam.
|
Plastic Cement/Glue
A generic term that usually refers to a cement used to
bond styrene surfaces. It is variously called Plastic Glue,
Polystyrene Cement, Plastic Cement, etc. I currently use
three bottles of plastic cement - Faller Expert Plastic
Cement, Citadel Miniatures Plastic Cement, and Tenax Cement.
Tenax Cement ($3, 1 fluid ounce,
hobby store) - a.k.a., "Tenax-7R Space Age Plastic
Welder, Super Fast-Dry Formula." I primarily use Tenax
Cement for quick flash removal.
It is the thinnest and quickest drying of the plastic cements
I own. It claims to be a strong and fast-drying glue, but
I honestly have not taken advantage of it as a cement.
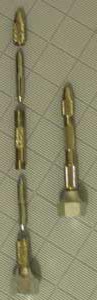
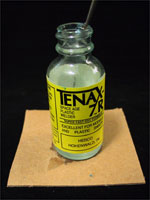
| A picture
of Tenax-7R Space Age Plastic Welder (I love saying
that every time). Notice the cardboard square I superglued
to the base. This is a safety measure to avoid tipping
the bottle over, which can happen surprisingly
easily and frequently when you get into some high speed
flash removal. Also be aware that Tenax evaporates quite
quickly. You should have a reasonably well ventilated
workspace and you should buy a replacement bottle when
your current one is about a quarter full. I personally
move on to the next bottle when it is about 5-10% full
as there is a slurry of flash and cement by that time. |
 |
Faller Expert Plastic Cement ($4.50,
1 fluid ounce, hobby store) - Faller Expert Plastic
Cement is my favorite for plastic bonding. Currently, I
only use my Faller Expert Plastic Cement for precision application
of glue missed when I did the bulk of the glue application
with Citadel cement. I am very happy with Faller and the
precision applicator is not only great because of its precision
but also because it does not clog.
Citadel - I bought the Citadel Miniatures
Polystyrene Cement when I first received my first Warhammer
40k army because I did not know the cement types very well
and I felt most comfortable buying what was made by the
company that made my plastic miniatures; I will probably
just us it until it is empty and then use just Faller. Clogging
is a problem with this cement. I have to keep a sewing pin
in the tip to keep it clear for use. The opening is large
enough that it is awkward
to apply cement sometimes and more than once I ended up
with a lot more cement than I wanted. Residue accumulates
easily and heavily on the tip, which makes for some stray
application that is unwanted.
|
|
|
Pinning
I like using pins to join pieces! It allows for stronger joints,
better posing, and for some models, like Games Workshop's Tyranid
Hive Tyrant, it's almost essential to keep your sanity.
Supplies
Bit Size
My paper clips are 0.035" in diameter. The harder the material,
the closer the hole size needs to be to 0.035". However,
a 0.035" hole in a soft material will be a rather loose joint
for a 0.035" pin. I generally use:
- 0.032" or 1/32" for plastic and to a lesser extent
with lead, this makes a snug fit even after the plastic deforms
a little inside. It allows me to make minis that are not unlike
action figures, with rotating limbs, head, etc.
- 0.035" for hard metal, such as the zinc washers I mounted
my large miniatures on. This metal will not give way to the
paper clip and you will run the pin through your hand before
you get it into the washer.
Marking Your Holes - Safer and More Accurate
It's a very good idea to create a dent in the material where
you wish to drill. This will prevent the bit from sliding to an
unwanted spot, including your hand. It's not just more accurate
it's safer. For my current marking approach, I clipped the head
off of a standard straight pin (the kind used for pinning clothes
together in sewing) and secured it in my pin vise. This makes
a very secure marking tool.
If you are trying to mark a ball joint or other rounded surface
for drilling and pinning, just take a file and file a tiny flat
spot to mark and drill.
Pin Vise - Tedious, Time-Consuming, and Tiring; but Inexpensive,
Precise, and Versatile
Generally, all of the holes you will need to make in a miniature
piece can be made well with a pin vise. It may take a lot of
time
and tire out your hand (which could lead to mistakes), but on
the road to perfection, this is the best tool. The slow cutting
speed is also a benefit as it allows you a greater capability
to adjust your angle, position, etc. as needed if you find you
are drilling slightly off, whereas power drills will efficiently
drill the wrong hole in a jiffy if you set it up wrong. That
said,
the pin vise is not my first choice usually.
Using a Standard Household Handheld Power Drill (My latest approach)
Yes, the seemingly big and clunky Makita handheld power drill
is becoming my new best friend for this task. It has a
variable speed trigger, which is crucial for this delicate
work; I can control the speed quite nicely by squeezing more or
less on the trigger. The mass of the drill and its speed makes
it a little more stable than a pin vise and the lower speeds make
it a lot safer than a Dremel Multipro. There a few precautions
to take:
- Don't drill too fast - the bit and/or part will heat up and
you run the same risk as a Dremel Multipro, that of the bit
seizing up, snapping off, and causing damage to your hand, the
pieces, or even the drill (especially if you throw it across
the room).
- Don't use a long bit - I actually keep the bit inset quite
far into the drill chuck, only leaving about 1/8" more
length than I absolutely need for the hole being made. This
also provides a ready depth guide.
- The drill is massive compared to the parts and drill bit,
so be extra careful not to absentmindedly twist the drill out
of position and snap the bit.
Benefits (note: a variable speed Dremel with low speed capability
would share some of these advantages)
- More stable drilling platform due to the mass of the drill
- Faster
- Potentially safest - you are not pushing a drill as hard as
with a pin vise and a hand drill is less susceptible than a
Hi-speed Dremel to bit seizing
- Reasonably safe for the miniature - less likely than high
speed drill to punch through piece, although pin vise safest
in this regard.
- Common appliance
- No cords - mine is a rechargeable
I pinned 8 Gargoyles in record time using this approach, with
less pain that using a pin vise, less danger than a Dremel Multipro,
and less time spent than with the other approaches I have tried.
Safety is a worthy concern too. I think using the Makita is safer
for me because:
- With a pin vise I would sometimes (although rarely) get impatient
and press too hard with the vise, resulting in broken bits.
- With the Dremel, the RPMs were too high, creating all sorts
of unpleasantness, such as heating of the piece, binding of
the bit, spinning pieces etc.
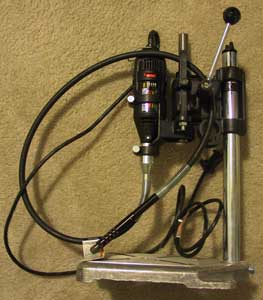
Dremel Multipro Tools (or similar high speed power drilling)
Dremel multipro tools are high speed drills, so a small mistake
can be greatly exaggerated. Sometimes a pin vise is highly advisable
instead of a high speed power drill, because you do not want to
punch through the other side or otherwise damage the miniature.
This is very true for plastic. Plastic is so quick and easy to
drill with a pin vise, that there is really no reason to use a
Dremel. On a lead piece, you will likely end up with blisters
before too long if you use a pin vise, and if drilling into a
hard metal, such as a zinc washer (if you are cool and secure
your minis with magnets like me :-) ), a powered drill is almost
essential. Given my experiences thus far, I would actually go
ahead and use my Makita hand drill (see above). The Dremel is
just too dangerous to me, the pieces, and the bits. When I did
use the Dremel, I used a drill press to hold the main unit, and
a flex shaft attachment so I could exert a little more fine control
on the bit.
- More dangerous - this method is more dangerous to you and
your miniature. You should have eye protection and be very careful.
- Mistakes are bigger - Any mistake you make will be quickly
compounded by a high speed drill.
- Punching through - There is a much greater risk to punching
through the other side. A drill press accessory for you Dremel
tool might be useful in some cases.
- Pilot hole - Start the hole with a few twists of your pin
Vise. Even if you just make a tiny indentation, it will be enough
to guide the drill. Otherwise the Dremel will pick a spot and
drill without consulting with you first and smooth metal surfaces
offer a lot of room for error.
- Control - I recommend getting a flex-shaft attachment and
a mount for the Dremel (I use my Dremel drill press to hold
my Dremel). The flex shaft allows you to hold the Dremel like
a pen, a very long metal pen. This is much more manageable and
allows finer control.
- Collets - you will need to get the full set of collets to
accommodate the smaller bits. I also find that even with the
right collet, I often have to take the collet completely off
the Dremel to change out the tiny bits I use for pinning.
- Speed - I use the lowest speed setting for all of my pinning.
High-speed Bits Versus Manual Bits
The bits you will find at a hobby shop for a pin vise are specifically
designed for a slow turning low torque process. If you put them
into a Dremel, it is only a matter of time before they will snap,
bind, or be damaged in some other way. Dremel does make a set
of drill bits. The smallest one is 1/32".
Drilling Holes in Plastic Parts*
For plastic parts, as noted above, I will usually just use manual
drilling. I start and finish with a 0.032" manual bit in
a pin vise. Plastic is incredibly easy and quick to drill, and
because of this it can be easily damaged or made to large with
a high speed drill. There really is no significant advantage to
high speed drilling here. Another problem is that the plastic
can and probably will melt from the high speed drills. With the
Makita, I can control the speed enough that drilling plastic is
reasonably safe, but the loss sensitivity makes it harder to detect
when you are about to punch through the piece.
* - Note: I have not done resin, I would probably try this method
first, then the hand drill.
Terms used
- normal - refers to something (technically a vector)
that is perpendicular to a plane in all directions, e.g. a pencil
standing perfectly straight up on a flat tabletop.
- knob and cavity - generally the joints I am
talking about are something knob-like joining to a spot that
is cavity-like. Knob will be used to refer to the knob or ball-shaped
component and cavity will be used to refer to the indentation
the knob inserts into.
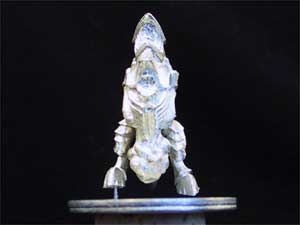
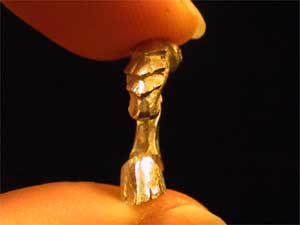
Pinning Procedure - Example #1, Pinning the Legs on a Biovore
- Clean all of the flash off of the pieces.
- Play around with the model, loosely assembling it to get a
feel for how it will go together. Pay special attention to the
angles of the limbs with respect to the body.
- Prepare all of the joints and the feet for pinning.
 |
 |
| Starting with
right leg. |
File a flat
spot for drilling |
 |
 |
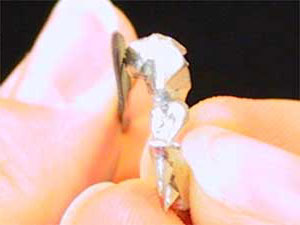
| Drill a hole
in the hip for a pin |
Prepare a pin
by cutting it and filing the tips smooth. |
 |
 |
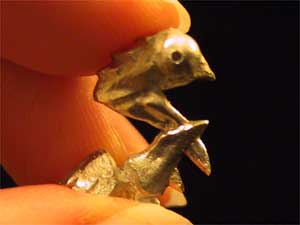
| Insert the pin
in the hip. |
Press the leg
and pin into the hip joint of the body. |
 |
 |
| This will create
a mark that indicates where to drill. |
Drill a hole
in the hip joint of the body for pinning. I recommend
drilling each hole individually, rather than drilling
one hole straight through. [For some models, drilling
straight through might be better, especially if there
is so little material as to leave you no choice] |
 |
| After drilling,
clean up the hole edge with the tip of a knife. |
- Repeat this process with the left leg as well.
- Glue and pin the right leg to the body, using cyanoacrylate
glue...
- Wait for he glue to cure.
- Glue and pin the right foot to the washer base.
- Glue and pin the left leg on. I swiveled the left leg backwards
a little to support the notion of walking, but not so far that
it would not be supported after the putty was added to the base.
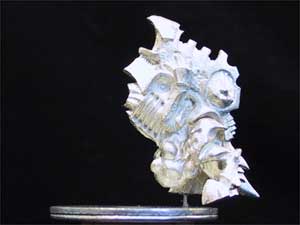
Pinning Procedure - Example #2, Pinning Together a Hive Tyrant
- Determine the proper orientation of the two pieces. Keep in
mind how closely they need to meet and any other pieces that
might depend on this joint.
- If a knob fits into the cavity, then I usually drill the hole
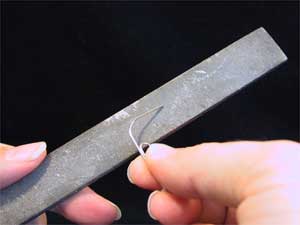
in the knob first. If the knob is rounded, I make a tiny flat
area by filing. The flat area is made normal to the desired
pin orientation.
- Drill a hole, positioning the pin vise normal to the joining
surface. I drill in at least 0.100", but I usually will
go as much as ) 0.250" if the material allows it. Note
that you may need to use a different drill bit size depending
on the pin you use. See the notes above about the different
techniques I use for drilling in to plastic versus metal.
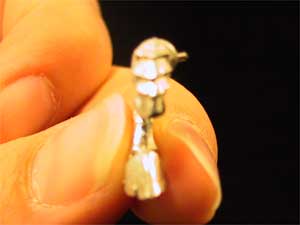
- Insert a pin into the hole that is definitely long enough
to protrude. [Yes, this is a different piece, but you get the
idea]
- Cut the pin as short as you can without losing the ability
to pull it back out. In the example shown below, I have left
the pin absurdly long for visibility purposes.
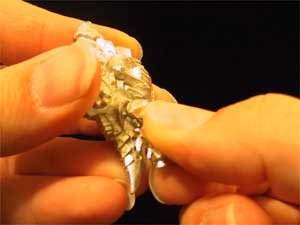
- Position the knob piece in the desired orientation and press
it onto the pin manually, perhaps wiggle it about a bit. This
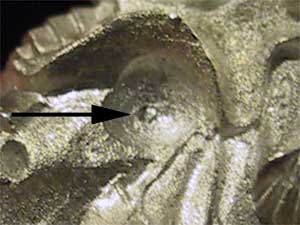
will create a mark to indicate where to drill.
- Be sure to check visually at what angle to drill. You want
to drill the hole in the cavity so that it will line up with
the hole in the knob. There is a little room for error, as the
pin will bend readily, but it gets exponentially harder to do
this properly as the holes get farther mismatched. You will
get better at this and eventually you will have pins that slide
easily and perfectly into position.
- Drill a hole in the cavity to accommodate the pin as before.
Be careful not to drill through the piece and position your
hand and the drill to minimize the danger of drilling through
your hand.
- Make a new pin that is more than long enough to insert fully
into the knob and the cavity.
- Apply cyanoacrylate glue to the end of the pin and insert
it into the knob. I find that if you hold the pin so that it
points down while doing this, it works best. This way the glue
does not run up the pin and away from the hole.
- Wait for the glue to cure/dry.
- Test the other end in the cavity. Trim the pin down as needed
to allow the knob to seat into the hole fully.
- Is the angle right? If not, gently bend the pin into the proper
orientation. The piece and knob should slide into place easily
and the pieces should fit in properly. Note: grab the pin with
a needle nose and rotate the needle nose pliers to make the
bend; you do not want to put the torque on the glued part. Keep
you super glue handy to re-glue the pin into the knob. This
is the time to get the pin fit into the cavity correct, before
you glue it into the cavity.
- By now, you should have a pin that is securely glued into
the knob and which slides reasonably easily into the cavity
hole such that the knob fits properly into place. You may have
to start over again with a new pin or a different pair of holes.
If so, do it. You will be happier in the end if it is right.
- Apply cyanoacrylate glue to the end of the pin and the knob
and slide the pin and knob into place. Hold pressure for a short
while until the piece remains stationary on its own.
- Wait for the glue cure.
Last updated
2005-05-28
|