|
I am obsessive about removing all of the flash from my miniatures.
When I got into Warhammer 40k, this become a liability because
of the sheer number of miniatures to prepare. I was clued into
a trick I could use with plastic miniatures by a fellow painter,
Brian, on the Yahoo!
group 'mini-painter'. He informed me about a type of cement
that can be used to get rid of flash and mold lines. This helps
a lot with hard to reach places where a blade is awkward and also
in spots where the flash is minimal.
I would strongly recommend a combination of blade and cement.
You should use a blade as usual on long smooth surfaces and easy
to reach areas. You should also use a blade to reduce the flash
in heavy flash areas. Ideally, the cement will be reserved for
fine flash in difficult-to-reach and/or delicate areas in which
a knife is hard or time-consuming to use.
What follows here is my current technique. You might find that
Tenax alone works best for you. I want a nice clean model when
I am done, so I use a knife for the bulk of the flash removal,
but avoid hard to reach or fine areas that I might damage. I
then
go over the area with Tenax. I find that for me, using Tenax exclusively
will lead to unwanted obliteration of details. The example that
follows is the assembly and cleaning of a Gaunt model for the
Warhammer 40,000 game (Games Workshop).
I'm Melting!
Keep in mind that, basically, you are locally
dissolving the plastic in a controlled fashion, so
excessive application of this will
destroy
details. On the other hand, you can use this technique to help
smooth out regions where you have gouged or scarred the plastic
with a file, knife, etc.
Supplies
- Tenax Cement*
- and only Tenax Cement. I have not tried it with anything else
and I was instructed to use specifically this cement.
- Red Sable brush - yes, you are throwing away a good brush,
but figure it's worth it. You are melting the plastic, so a
crappy brush or a brush with too much spring will create more
blemishes than it resolves. I use a 2/0, but you might want
a finer or larger one as dictated by the features you are brushing.
Using a big brush between two small closely spaced features
will probably leave you with two smaller, smoother, farther
spaced features.
- Xacto Hobby Knife - You must have adult supervision!
This is used to trim flash.
* - actually "Tenax-7R SPace Age Plastic Welder Super Fast-Dry
Formula" :-)
Procedure
- The limiting factor here is where I can reach with a hobby
knife and a Tenax-coated brush. In the case of this model,
I could assemble the body and head without compromising my accessibility,
but the arms blocked the body, so I left them off until later.
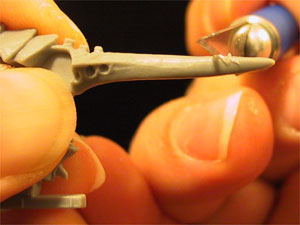
| Trim mold lines
and flash from long smooth surfaces where a knife is easy
to use. In places like this, Tenax may do more harm than
good by introducing disfiguring brush marks. Note that
I am dragging the blade at about 75 degrees, not cutting
into the material. I use light quick strokes so as to
err on the side of removing too little flash rather than
risking gouging the material. Fresh, sharp blades are
essential. Skip knobby and hard to reach areas until you
get to the Tenax. |
 |
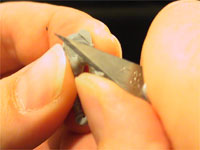
| WARNING: YOU
MUST HAVE ADULT SUPERVISION WHEN WORKING WITH A KNIFE!
Trim off heavy flash, such as where the piece(s) connect
to the sprue. Note that I have the base and handle
of
the blade firmly secured
against my
thumb to constrain the knife to a short, slow, controlled
cut. Do not drag
the
knife along its edge, just press it slowly and gently
towards your thumb;
it's similar to pinching the piece it
between your thumb and the blade.
If you drag it along the blade surface,
you will cut your
thumb! This is dangerous
for your thumb and the model, so be careful! |
 |
- By now I have cleaned the bulk of the flash off of the body
halves. I cleaned the excess flash off of the head and assembled
all three parts with Faller Expert Plastic Cement.
- Now it's time for Tenax. I like to get the brush well saturated
by dipping and swirling it in the Tenax for 30-60 seconds. Dip
the brush into the Tenax and scrape off excess once as you withdraw
the brush.
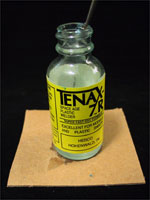
| A picture of
Tenax-7R Space Age Plastic Welder (I love saying that
every time). Notice the cardboard square I superglued
to the base. This is a safety measure to avoid tipping
the bottle over, which can happen surprisingly easily and
frequently when you get into some high speed flash removal.
Also be aware that Tenax evaporates quite quickly. You
should have a reasonably well ventilated workspace and
you should buy a replacement bottle when your current
one is about a quarter full. I personally move on to the
next bottle when it is about 5-10% full as there is a
slurry of flash and cement by that time. |
 |
- Brush across the flash, stroking perpendicular to the flash
or mold line.
| This is where
some art comes into play. You will need to practice this
technique get it just right. The basic requirement is
to stroke perpendicular to the flash line that you are
trying to remove. If you come across a thick or heavy
piece of flash, stop and use a knife to reduce it if possible.
Tenax does not care what it melts and if you try to reduce
a very heavy piece of flash from your models, you will
likely obliterate some details in the process (See What
Not To Do) |
 |
Tips
- Practice on a piece that you don't mind ruining!
- Use less glue and more brushing to reduce the flash.
- Use more glue and less brushing to smooth a region out. The
ultimate limit of this is just using the brush to deliver a
large drop to the region and letting surface tension sort out
the surface (i.e. no brushing).
- This works best in hard to reach places and not as well on
long smooth surfaces, where a good old knife is better.
- Buying Tenax - I found it at both of the hobby stores I frequent,
although one of them kept it behind the counter. I have been
told that you can also buy it online from Micro-Mark
(I have not used them and cannot endorse them).
Some Results
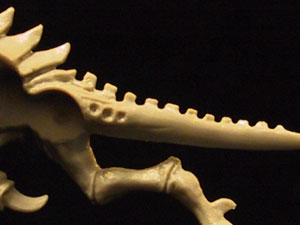
Genestealer's Back
(normal flash in a difficult spot)
|
|
|
 |
This worked remarkably well for the back. A knife would have
either left bits unfinished or produced at least some small amount
of scarring.
What
Not To Do* - Genestealer's Head and Tongue (heavy flash
and a step at the mold line)
|
|
|
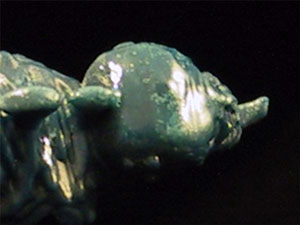 |
On the head and tongue I left the heavy flash on there and used
only the cement to remove it. This created quite a sheen to
the
areas treated. There was also something of a step at this mold
line, and more cement was required. Of course, with a knife
I
would have ended up shaving/scraping down the step, so this approach
left more of the plastic intact. Also note the tongue, which
is
exceedingly difficult to safely clean with a knife. What
I should have done is use the knife as much as possible, then
go with the cement.
* - You should reduce large amounts of flash with a blade or
file first.
Hormagaunt's Body
(Overall)
|
|
|
 |
Hormagaunt (Close
up)
|
|
|
 |
Last updated
2004-03-24
|