|
Here I show how I made some components for terrain from some simple
and cheap (mostly free) materials. The idea of this bunker was for it
to be large enough to hold a small transport vehicle for Games Workshop's
Sci-Fi minis game, Warhammer 40,000 (WH40k).
WARNING: You should not attempt these procedures without an adult present.
U-Shaped Handle
The perfect handle for any hatch and it is really easy to make, after
a practice run or two. :)
Materials
- Styrene rod of
desired thickness (I used 0.10" diameter rod)
- Smooth pliers with adequate taper to accommodate desired length
of handle
- Candle & something to light it with
- Materials for pinning
- Hobby knife or The Chopper (ideal for cutting thin styrene
rod)
|
Procedure
1. Grasp the rod in the tip of the pliers and hold it near the
flame. Use as little heat as possible. If you get too close, the
rod will melt and deform in unwanted ways.
2. As the rod softens and begins to bend, rotate the pliers 90
degrees. This prevents the rod from falling down and smacking the
table, candleholder, etc., and helps use the torque of the rod's
weight to bend the rod. Pull the rod away and tweak the bend slightly
by hand as the rod cools. You have a few seconds to work with it
and you can heat it again as necessary to soften it.
3. Grasp the rod as closely to the first bend as is appropriate
for your desired handle length. Heat and bend the rod again, as
before, taking care to heat only the area where the second bend
is to occur.
4. Now, clip off the excess rod material. Clipping the piece as
a unit provides a nice flat, flush surface common to both ends
of the handle.
5. Now we have a handle, ready for mounting to a door or hatchway.
6. Here is an example of a handle affixed to a hatchway. I used
the pinning approach to affix
the handle with 5-minute epoxy because of the small amount of surface
area that is actually affixed to the hatch.
|
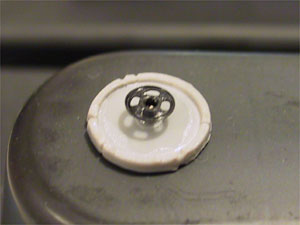
Small Hatch Lid
Often, you'll want to put a hatch on a flat surface to provide an access
point. This hatch is a good size for a storage container, e.g. fuel tank.
Materials
- Fabric snap
- Spare round piece of plastic (I used a spare wooden shield
from the a set of skeletons)
- Materials for pinning
|
Procedure
1. Pin the fabric snap to the plastic disc with 5-minute epoxy
such that the excess pin protrudes from the bottom of the hatch
lid. The pin is really necessary for the overall structural integrity
of the component.
2. Drill a hole in the desired location for the hatch and glue
it in place (I use 5-minute epoxy).
|
Reinforced Door
Your toy soldiers have to get in and out somehow.
Materials
- Styrene sheet
0.60" thick
- Styrene strip
0.125" wide, 0.020" thick (I cut this from a sheet
of 0.020" styrene)
- Fabric snap
- Materials for pinning
- Xacto knife or The
Chopper (ideal for cutting thin styrene rod)
- Faller plastic cement (the syringe applicator is very handy
for this.
- 5-minute epoxy
|
Procedure
1. Cut out a rectangle of styrene sheet 1.5" H x 1.25" wide
2. Lay down one strip from the top left to bottom right corner
of the door and glue it in place with Faller plastic cement.
3. Lay a piece across from the bottom left to top right and mark
the angle to cut.
4. Cut the piece and trim as necessary, then glue in place with
Faller plastic cement. Note that the pieces don't quite perfectly
match up to the initial strip. That's all right, I will cover that
up later. As long as the cut strips are parallel with one another,
it's good enough.
5. Using The Chopper,
I then clip off the corners. This approach really speeds things
up because you aren't worrying about cutting the strips and door
exactly ahead of time.
6. Finally, glue a snap in place. I used the other half of the
snaps I used to make the small hatch lids above. The important
part is using a snap large enough to cover the joints. I glued
the snap flush against the door. If you want the snap inverted
so that the flat part protrudes, as with the small hatch door,
then I strongly recommend you pin the handle in place.
|
|