Magnets - Securing
and Transporting Minis with Magic!
Oh, but I do love using magnets to secure my minis! There are
two basic approaches: 1) make the base magnetic and/or 2) make
the base attractive to magnets. You can do one or both. Here are
the topics for this page:
Note: The metric I use for my bases is that they can be safely
transported sideways and upside down with some jostling. I actually
place in a tin lid and rap the tin on a hard surface. I do not
settle on a solution until a miniature is essentially stable under
these conditions. I would still recommend storing the mini so
that it cannot easily slide around; the simplest solution would
be gluing stops in place, e.g. a piece of flat balsa between the
rows of minis this can also help remind you to use a safe spacing
for your minis so that yo can get them out again without damaging
them.
* - Zinc washer refers to the common metal washers, which are
zinc-plated steel, as opposed to stainless steel.
|
Magnetic Media
Basically, there are magnetic strips, magnetic sheets, and magnets.
If you have more info or another good vendor, let me know.
Buying online
I just looked at the back of the magnet packs from what I had
and chose one of those web sites. It's Magnetic
Specialty, Inc. On their "Retail
Products" page they have magnetic
strips, magnetic sheets (5"
x8" sheets, and 1'
x 2' sheets), and actual magnets (in 3/4"
and 1" squares and 3/4"
and 1" buttons/discs). I have purchased 1/2" magnets
made by them, so I know they make those as well.
Another vendor that I have been told of is in Australia and provides
very inexpensive rare earth magnets, Magnetic
Force.
Games and miniatures store may have useful stuff as well, especially
those that cater to historical miniatures hobbyists. Warweb.com's
accessories page lists magnetic trays and magnetic bases.
Magnetic Strips
This was pretty easy to find. I found 1/2" wide strips at
Home Depot in their tool area. I also found 1" strip material
at Texas Art & Supply at about $1 a foot.
Magnetic Sheets
These can be found in various places, but there seems to be nothing
consistent. Sheets are generally not strong enough for storage
purposes, but should be fine for movement trays (a little tray
that you use to move entire units quickly on a board in wargames).
The magnetic sheet used for magnetic signs for cars might be stronger.
- Photograph backing - I used to find these all over the place
in large sheets for backing photographs.
- Business card backing - These I usually found near the copy
center in Office Depot and Office Max.
Magnets
A seemingly obvious choice. You can usually find small disc shaped
magnets with 1/2" and 3/4" diameters where you find
crafts, I even found them at Wal-Mart and K-Mart in the craft
sections and/or the affixing stuff (where they have tapes, tacky
stuff, Velcro stuff, etc. The magnets are made by ProMag DYNA-MITE
and made by Magnetic Specialty,
Inc.
I also found a good selection of these at Bering's Hardware
in the hobby materials section, including including 1" diameter
circles and a 3/8" thick rectangular one that is 7/8"
x 1 7/8".
I found some fashionable-looking disc-shaped refrigerator magnets
that were 1 1/4" in diameter, but the cost comes out to about
fifty cents apiece.
|
Transport Mk I - Metal Tool Box
The various basing schemes I have all
involve models that end up magnet-capable but not physically very
different, so you can store them in the old fashioned primitive
ways, but why? You can now use tins, tool boxes, utility drawers,
etc. to move them. You can even get crafty and equip your favorite
container with magnetic tape. Remember that both the magnetic
bases and the zinc washer bases will stick to a magnet, so you
can use magnetic tape/sheet for either (although steel-magnet
strip is usually better than strip-strip). Just be sure that the
magnet material is strong enough for your needs.
I have tried a metal tool box in the past, one made by Craftsman,
with drawers. It worked reasonably well, but here is what I disliked
about it:
- A little on the heavy side.
- Not enough variety in compartment size
- Somewhat prone to being tipped or knocked over; this can be
avoided by forking out more money for smaller tool boxes. Example:
time my four drawer Craftsman toolbox it was knocked over hard
and some of my miniatures were damaged.
Given what I know now I might put magnetic sheeting down in the
tool box and use my washer based minis approach.
The Rockit uses the former approach (magnetic sheet affixed
to the mini) and detailed instructions can be found in this Chaos
Mail Order article.
|
Transport Mk I - Parts Containers
After some minis got damaged from a tipping toolbox, I decided
to try something else. I wanted to transport more than just my
army anyway, so I needed something large with compartments. So,
I tried a large vinyl trunk and I store the minis inside it via
a compartmentalized system.
I found the compartments in the form of parts containers at
Home Depot. The outermost lip of the container takes up 14 1/4"
x 11 1/2" x 2 1/2" deep. Each compartment is 2 1/4"
deep and 2 1/2" high. Each container can hold 12 Genestealers
16 Running Gaunts, and 16 Leaping Gaunts, with one empty compartment
to spare. The top and bottom row compartments (holding the Genestealers)
are 2 1/4" wide. The single large compartment (holding the
Running Gaunts) is just under 11 1/2" wide, with another
2 1/4" wide compartment next to it. The four medium-sized
compartments (holding the Leaping Gaunts) are 3 3/16" wide.
Trunk - These compartments fit nicely into a black vinyl trunk
that I bought at Academy, a local sports store. The small plastic
boxes in here hold my big minis; I bought them at Michael's, a
local hobby shop (yes, I spent some time looking for stuff to
fit together well).
|
Mark II - Plasticore Slats
In this approach, I used strips of surplus plasticore 12"
long x 2.5" wide. I simply snatched up some of the leftover
signs after election day one year. :) I then used boxes from various
computer packaging. The short guys, my various Gaunts, were mostly
stored in a keyboard box. The others were in an unusual computer
packaging box that was higher than usual, which was good for my
big guys, but it had no top on it, so it needed to go on top.
A strip of good quality magnetic strip was placed on each strip
of plasticore. Generally, the strip was offset to one side to
accommodate tails and such. For Gaunts, a 1/2" wide strip
of magnet material is actually just fine. For large models, two
parallel strips of 1" material worked well.
Tipping Hive Tyrants were still a problem, because they have
such ridiculously small bases. So I used a large rectangular ceramic
magnet to firmly affix the model to a larger washer (like those
used for a Carnifex). This larger washer and the somewhat heavy
magnet provided a wider base and lower center of gravity, so they
were pretty stable after that.
Here's the trunk with supplies, models, some felt for the gameboard
(folded and between/under the models), a bag of Fortification
walls and the digital camera case (must have!).
One big advantage of this setup is playability. I can deploy
and put away my minis very quickly, which is nice when you are
playing with large armies.
|
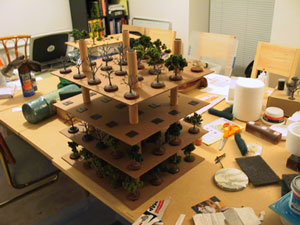
Mark III - Tiers (for my trees)
For trees I wanted to be able to stack them deep in a plastic
bin, so I made some sturdy stackable tiers for storage and transport.
 |
Materials
For a single tier, you will need
- 4 sections of hardwood dowel rod 1" diameter, cut
to a length appropriate to the height of your trees. I
used 4" sections in this example.
- 4 steel fender washers 1.5" diameter sized for
#8 screw head
- 4 #8 screws, 1 1/4" long
- 1 piece of hardboard, approximately 14" wide x
17" long. (this assumes a Deeper bins taper to a
narrower footprint at the bottom, so be sure to premeasure
- 40 strips of magnetic tape of appropriate length. I
used 1" long strips for the 1.5" washer bases,
and 1.5" long strips for the 2" washer bases.
You will also need a bin. Storage lockers can be purchased
with a 24"x36" interior footprint. Rubbermaid
makes a line of bins called "Snaptoppers(TM)".
The 30, 45, and 60 qt variety have a ~14"x17"
internal footprint and ~18"x24" external footprint.
So I can neatly and tightly stack two side by side in a
cabinet. The usable interior height is a little over 6"
(30 qt.), 9" (45 qt.), and 12" (60 qt.).
Tools
- Pencil for marking cuts
- Ultrafine Sharpie - for marking drill points on hardboard
- Miter saw - for cutting dowel rod
- Sanding block - for finishing cut surfaces on dowels
- Nail - to make a dent to guide drilling
- 3/32" drill bit - for drilling pilot holes for
the screws
- 3/16" drill bit - for drilling holes in hardboard
for screws to pass through
- Drill
- Hammer
- Chopper - I used this for cutting up the magnetic strips.
- Screwdriver and/or screwdriver bit for drill
|
Procedure
- Preparatory work
- Cut 4 sections of dowel rod per tier
- Sand the rough edges where the cuts were made and
along the sides as needed to reduce splintering
- Tap the nail into the center of each dowel; just
a couple of taps to make a deep enough divet to guide
the drill bit
- Drill pilot holes in the center of the dowel rods
to a depth of about 1"
- Mark and drill holes on the hardboard. I used the
following spacing approach:
- I want a 3" footprint around a tree.
- Along the 14" dimension, that gives me
4 trees plus 2" extra.
- Along the 17" dimension, that gives me
5 trees plus 2" extra.
- Allowing 1" between the first and second
rows from each corner, I end up marking and drilling
the holes 3.5" in along each edge from the
corner
- That leaves 20 spots to mark for the tree locations.
For the benefit of mass assembly, I use a little trick.
I marked one piece of hardboard and then clamped all
of my hardboard sections together and drilled the
marks through all of the boards using the smaller
3/32" drill bit.
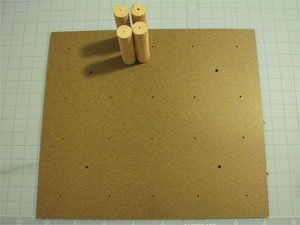
This is what I start the assembly process with:
 |
-
Apply magnet strips to tree locations. I place two
1/2 wide strips slightly spaced apart.
- Secure the dowels to the board. I did this in two parts
to avoid tearing up the dowel. I set my drill to a limited
torque so that it would drive the screw in most of the
way, but not completely.
Then I used a hand screwdriver to finish driving the screw
into place.
- Then I applies 3/4" adhesive backed rubber anti-skid
cushions on the top of the dowels. This served more than
one purpose. Aside from absorbing shock slightly, it prevented
the tiers from sliding on top of each other and smacking
into the sides of the bin during transport.
- Add trees, and Voila!
Here are the trees safely tucked away in their bin:
|
|
Mark IV - Shelves
Finally, I am approaching the solution I would like to have.
This setup is close to a permanent solution, although it will
may just serve as a mockup for the day that I have full access
to a wood shop. Still, I could probably not make a lighter container
with the same capabilities very easily out of wood. Enough jibber-jabber,
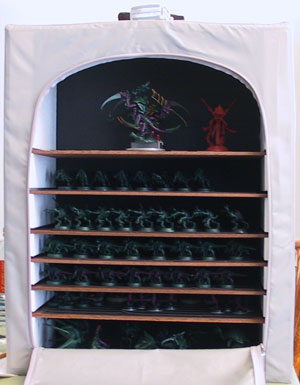
here's the setup:
Not exciting, eh? Well, let's open it up...
 |
Materials
- 1 SKUBB
storage
bag 45 cm x 56 cm x 8 cm (17 3/4" x 22 "
x 7 3/4") [US$8 from Ikea]
- Hardboard shelves [US$3 DIY store]
- 5 pieces of 1/4" thick hardboard cut to 7 3/4"
x 15 1/4"
- 2 pieces of 1/4" thick hardboard cut to 7 3/4"
x 17 1/4"
- Foam supports - one block at least 22" x 8"
x 3" or two pieces 22" x 8" x 1.5"
[Various]
- Foamcore back panel - 20" x 30" x 3/16"
is adequate [US$3 various]
- Polypropylene strap - 2" wide x 80" long with
metal buckle
- Soft-Grip "Double Handle Cushion"
- Magnetic Tape
Stores I used (Houston, TX)
- SKUBB bag - Ikea at Silber & I-10
- Hardboard - bought and cut at Home Depot near Westpark
and West Loop 610
- Foam supports - the foam was bought a while ago from
The Foam Store
(2217 W. 34th, Ste. E)
- Foamcore - that's everywhere, but I think the particular
piece I used was bought from either Texas Art Supply (near
Montrose & West Gray), K-Mart, or Wal-Mart.
- Polypropylene strap and Soft-Grip handle - Luggage
and Leather (Richmond & West Loop 610)
- Magnetic tape - Texas Art Supply (near Montrose &
West Gray)
First, why did I use hardboard instead of plasticore? First,
there is the issue of sag:
Second, the hardboard can be sanded to nice round corners,
which is the easiest solution for shelves that won't chew
up the foam supports.
Third, the hardboard will increase the overall structural
strength of the system.
The main downside is that by using hardboard over plasticore
for shelves, I am adding about 4.5 pounds to the weight
of the system, as opposed to about 1 pound.
Tools
- Hot wire scroll table
[Hot Wire Foam
Factory]
- Pencil for marking hardboard
- Ultrafine Sharpie - for marking cuts on foam
- Sanding block - for rounding hardboard corners and smoothing
cut edges
- Chopper/Scissors/Knife - I used this for cutting up
the magnetic strips.
- T-square/ruler for marking hardboard
|
Procedure
1. Prepare the foamboard back panel - Using a hobby
knife, cut the foamcore panel down to 21" x 17 3/4".
2. Plan out your shelf heights - I wanted to have
all of my monsters on the bottom, but my Hive Tyrant minis
are a good 2" taller than my Carnifex minis. So I stuck
with a strictly height-based setup. Since the top shelf
will have a larger opening in the center (due to the rounded
opening) and I only have two Hive Tyrant minis, I decided
to put them up top. Anyway, let's just look at the plan:
3. Prepare the foam shelf supports
- Cut down foam to 21" x 7 3/4" x 1.5".
I used a 3" thick piece and cut it in half. While
this may seem more challenging, it guarantees the pieces
are similar in dimensions.
- Measure the heights of your shelves and mark the foam
support appropriately.
- Mark the cuts so they are 1/2" deep and leave
a 3/8" high wide slot along the full 7 3/4"
depth of the foam supports (this leaves a little slop
for the shelf, which is 1/4" thick).
- Carefully cut the shelf slots out of the foam. This
is where the precision of the scroll table is very handy.
You can probably get buy with some other tool, but being
able to cut the whole trench in one shot is very nice
and is conducive to a uniform cut.
4. Prepare the shelves -
- Sand the edges and corners of the hardboard. The corners
should be well rounded to prevent them from gouging out
the shelf slots.
- Apply magnet strips as desired. Remember to leave at
least a 1/2" dead space on each short end of the
shelf to account for the portion of the shelf sliding
in; I recommend 5/8" or more. The less precisely
the shelves fit into the system, the more dead space you
will have to leave so your miniatures are smacked into
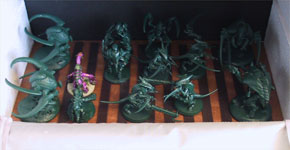
the side walls. Here are some images, in the order I built
them (bottom up).
 |
| Bottom shelf - I want this
shelf to be versatile, so I put down a generous supply
of
magnetic tape spaced so just about anything could be
placed anywhere. I used 1/2" magnetic strips spaced
every 1/2". |
|
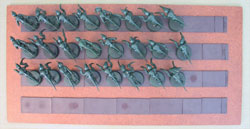
2.5" shelf - 24 Hormagaunts,
8 Ripper Swarms
|
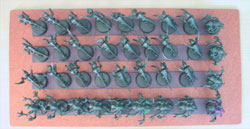
2.5 " shelf - 24 Lysogaunts,
12 Genestealers
|
|

1.5" shelf - Spore Mines,
Ripper Swarms
|

1.5" shelf - 32 Spinegaunts
(x 2 shelves)
|
| Troop shelves -
I wanted the magnetic strips to be a guide of sorts,
and I wanted to be able to fit 32 Gaunts on a single
shelf. So I went with four long strips along the
long
axis of the shelf. Each strip was 13.5" long, leaving
a 1" border from the short shelf edges (remember
the minis need to be at least 1/2" from the short
edge to avoid hitting the foam walls. The shelves are
7 3/4" deep and each strip is 1" wide, leaving
3 3/4" for spacing. That conveniently leaves enough
for five 3/4" gaps (that was no accident). So the
strips were spaced 3/4" from the long edges of
the shelves and each other. |
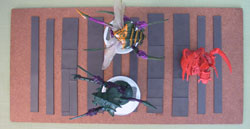 |
| Top shelf -The curvature of
the opening allows tall minis to live in the middle
of this shelf. |
5. Assembly - This is the easy part.
- Open the SKUBB storage bag and prepare it for loading
(pull the side supports down into position and open the
zipper)
- Place the bottom shelf into the bottom of the bag.
- Carefully slip in one of the foam supports at a diagonal.
- Slip in the top board (the blank 17.25" hardboard
piece that we have not worked with yet) and hold it up
against the top of the SKUBB. If your hardboard has a
rough side, make sure that faces up.
- Carefully push the foam support into place, sliding
it along the hardboard until it rests snugly in the side
of the bag.
- Insert the other foam support and push it into place.
- Insert the shelves.
- If you have a strap, wrap it around as shown below and
apply the soft-grip handle (if you have one).
|
|
Other Approaches
|
|