Making Modern Battlefield Obstacles
Razorwire (a.k.a. Constantine wire), tank traps, and mine fields are
useful pieces of terrain for any modern or sci-fi miniatures war game.
The following pieces were made specifically for Warhammer 40,000 (a.k.a.
40k), made by Games Workshop. The hobby magazine for Warhammer 40k, called White
Dwarf, had a great article on defensive obstacles for 40k [WD257,
pg. 38]. In that particular article, they show how to make razorwire,
tank traps, and minefields. I used slightly different approaches, but
you should definitely consider checking that article as well.
WARNING: You should not attempt these procedures without an adult present.
(Removable) Razorwire
Razorwire refers to constantine wire, which is barbed wire with small
thin razor blades instead of barbs; it is designed to maim people and
is very nasty stuff. Generally, it is used by the military. Concertina wire generically
refers to barbed wire that is coiled for deployment as an obstacle or
barrier.
In Warhammer 40k, razorwire is used to refer to an obstacle intended
to impede infantry but not vehicles and the game mechanics reflects this.
The following approach produces a wire obstacle that abstracts concertina,
constantine, razorwire, etc. I call it razorwire on this page to be consistent
with the 40k terminology, although I suppose that technically it is concertina
constantine wire. :)
Time: About 20-25 minutes to build a pair of sections. Painting,
dry brushing, and flocking take about another 20-30 minutes or so for
a pair of sections depending on taste. Because the wire comes off in
strips sufficient to make two sections, it is efficient to make two sections
at a time. I recommend building all of the sections in advance and then
painting and finishing them all at once.
The 40k rules call for 6" long sections. The width is not specified
in the rules, but 2" works and it seems to be an accepted convention,
as that is what was given in the article cited above. So I went for a
2" x 6" section size.
Materials
- 0.060" thick styrene sheet
- one plastic log from Tamiya Barricades set
- Hardware cloth
- Xacto knife
- The Chopper
- plastic glue
- paint brush
- black spray primer
- white glue (a.k.a. PVA glue, a.k.a. Elmer's Glue)
- fine sand
- green flock
- craft paints
- Delta Ceramcoat Brown Iron Oxide
- Delta Ceramcoat Toffee Brown
- Delta Ceramcoat
- Delta Ceramcoat
|
Procedure
1. Cut out a 2" x 6" piece of styrene sheet.
2. I began with a sheet of 0.060"-thick styrene sheet
(a.k.a. plasticard) from which I cut a 2" x 6" piece
(see bottom of picture).
3. I chopped the plastic log in half and glued the halves to the
styrene, centered on the short axis and about 1/4" from each
of the short edges (see middle of picture above).
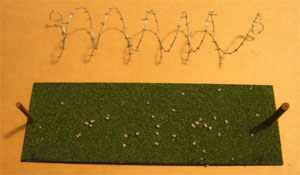
4. Then I clipped a 24" long strip from a sheet of hardware
cloth. I clipped the cross wires down to small nubs. I wrapped
the cut wire around a 3/4" diameter cylinder (dowel rod
or large marker) about 9 1/2 times. I then pulled the wire off,
stretched it out a little, made small loops on each end that
would slide over the logs, and then slid the loops down over
the logs. Note: the loops need to be on the same "side" of
the coil for it to sit well (see top of picture above).
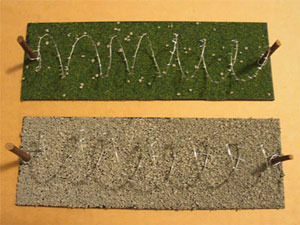
5. Remove the wire and prime the base and logs with spray primer.
6. Paint the logs with Brown Iron Oxide and highlight with a dry
brush of Toffee Brown.
7. Flock and you too have removable razorwire!
 |
| Then make 6 of each and Voila! You
are ready to play with the Obstacles rules in WH40k. |
|
Tank Traps
There are two basic types of tank traps that show up in miniatures gaming,
hedgehogs and dragon's teeth. The hedgehog consists of three steel beams
fastened into a six pointed shape. Dragon's teeth are big concrete blocks.
There are other types, such as a panzermauer (anti-tank wall), a ditch
(not that exciting of a terrain feature for gaming), and a bunch of innovative
applications of concrete blocks and/or pieces of steel beam.
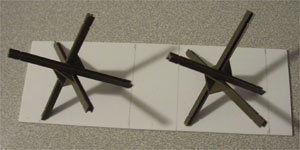
Hedgehogs
If you want to make hedgehogs, I would suggest using the Tamiya Barricade
Set; I found that even buying the raw materials in the form of styrene
I-beams, I still spent the same money and would end up doing twice the
work. Here's my result with Tamiya. I spaced them 1/2" from the
edges and 1" between the hedgehogs, so they would look good lined
up next to other hedgehog sections.
|
|
|
Finished product picture
will go here
|
Dragon's Teeth (a.k.a. Höckerhindernisse)
Basically, big blocks of concrete, often in the form of truncated pyramids.
The article cited at the top of the page includes a good method for using
corks. Here's how I made some quick and dirty ones that cost about 25
cents per section.
Time
- Step 1, Building: 10-20 minutes for 3 sections* + drying time
- Step 2, Texture paint: 3-5 minutes per section + drying time
- Step 3, Prime: 3-5 minutes total if spray primer, otherwise 3-5 minutes
per section + drying time
- Step 4, Paint and highlight "teeth": 2-4 minutes per section
for each step + drying time
- Step 5, Flocking: 2-4 minutes per section + drying time
- I recommend building all of the sections in advance and then painting
and finishing them all at once. This will allow you to cycle through
the pieces and minimize the delay due to drying time.
* - I recommend that you make all of the ones you want at once, as the
process benefits greatly from mass production.
Materials
- 1 strip of foam closure (or
corks, or blocks of foam)
- 0.060" thick styrene sheet
- marker
- Xacto knife
- 5-minute epoxy
- white glue (a.k.a. PVA glue, a.k.a. Elmer's Glue)
- green flock
- paint brushes, 1/2" wide head and 1" wide head
- texture paint (Behr Premium Plus, Sand Finish)
- craft paints
- Delta Ceramcoat Storm Grey
- Delta Ceramcoat Rain Grey
- Delta Ceramcoat Brown Iron Oxide
|
Procedure
1. Cut out a 2" x 6" piece of styrene sheet.
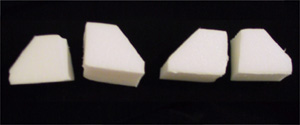
2. Prepare your tank trap pieces
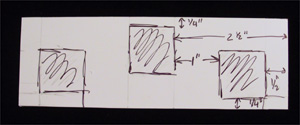
3. Mark the desired placement of your tank trap pieces. I ended
up turning the chopped pieces on their sides to create a taller
obstacle. They were about 1" x 1" at the base in this
position.
I wanted two adjacent sections of tank trap to look good together.
I opted for three pieces per section of styrene. Two account for
adjacent sections, I wanted a full space on either side of the
middle tank trap piece and 1/2 space at each end. That means a
total of three spaces. I had 3" to play with, so that left
me with 1" for a full space. So the middle piece had 1" to
either side, and the outer spacings were 1/2". I staggered
them forward and backward slightly because I thought it looked
good:
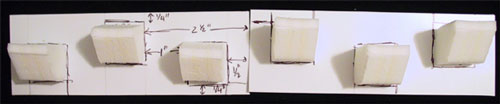
4. I tested it out before gluing anything in place or marking
additional sheets. I am unsure if I want the slopes forward or
backward, but I can decide that when I deploy them. Note: every
other section of styrene's markings were staggered in the opposite
fashion as illustrated below.
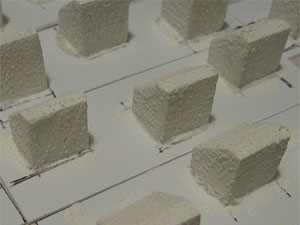
5. I mixed up a big blob of 5-minute epoxy adhesive and glued
them into place.
6. I then sealed the foam with texture paint (sand texture)
using a 1" wide brush.
7. Then prime (spray paint)
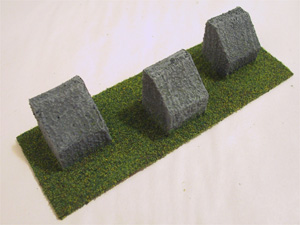
8. Paint the blocks Storm Grey, highlight with a dry brush of
Rain Grey, paint the ground Brown Iron Oxide.
9. Flock, and Voila!
|
| Then make 6 of each and Voila! You
are ready to play with the Obstacles rules in WH40k. |
Variations on the theme:
|
Minefields
Materials
- crater material/structure, if desired - I plan to use extra
tops from plastic petri dishes
- mine/detonator pieces - I plan to use snaps
- casualty bits, e.g. limbs, tires, etc.
- 0.060" thick styrene sheet
- marker
- Xacto knife
|
Procedure
1. Cut out a 4" x 8" piece of styrene sheet.
2.
3.
4.
5.
|
|