Procedure
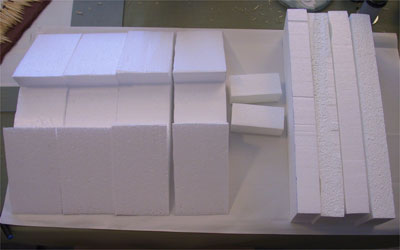
1. Using a hot wire scroll table, I first cut out the road sections,
four sections 3" wide and 12" long, and four sections
about 1.5" long. I will only need 3 long and 2 short in the
end, but for now, it was easy to create these pieces and accidents
do happen.
2. Then I cut the ramp supports with a hot wire scroll table.
I started by cutting down a block until it was 3" wide, 2
5/8" thick/high, and 12" long. Note: the thick/high dimension
was determined by where the 3" wide road would intersect a
30º angle from the base of the ramp support. I then made the
30º angle cuts, again with the hot wire scroll table.
3. Then I laid the ramp support upside down, butted a road section
against it and marked the outline for the gap in which the road
would sit. I then used the scroll table to make free hand cuts
(no cutting guide) to cut the gap. The gap was expanded slowly
and carefully with tiny cuts until it was 3 1/16" wide.
4. I set a guide and trimmed the roads down to a uniform 2 15/16".
Why wait until now? It's easy to leave the hot wire in some odd
configuration and it's easier to manage the pieces once the primary
cuts are done. This allows me to make a very precise final trimming
cut. These steps resulted in piece that fit loosely enough to allow
for the paint I would apply, but not so loosely that it looked
silly.
5. Test the pieces before continuing. This is just a good habit.
I'd hate for this to not work *after* I finished painting, sealing,
etc.
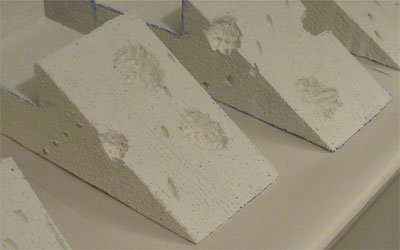
6. Apply some battle damage. Pull some chunks out with your finger,
then use a hot wire engraving tool to make quick repeated strokes
out from the center of the supposed blast. Also, some simple deep
holes in a gently curving line make good automatic weapon damage.
Be careful to make the holes the full thickness of the engraving
tool. If they are too small, they will be filled in with the texture
paint and subsequent paint layers, defeating the purpose.
7. Apply texture paint. Be careful not to fill in your battle
damage.
8. Paint the pieces with latex paint matched to Storm Grey. After
drying, touch up white spots with a smaller miniature brush (I
used a size 4) and Delta Ceramcoat Storm Grey.
9. Highlight the pieces by drybrushing with Delta Ceramcoat Rain
Grey. By the time you cycle through a few of these pieces, the
starting piece will be ready for the second highlight of Delta
Ceramcoat Hippo Grey.
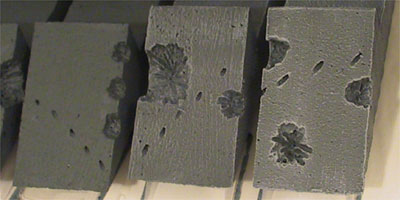 |
| From left to right, basecoat only,
first highlight, both highlights. |
To be continued...
|