Battle Report 10 - The Wrath of Scourgemaster Rodaxus
Tyranids vs. Chaos Space Marines
Composed by Michael J. Casavant (Hive Fleet Phage)
Summary
- Date - 07OCT2001
- Points - 1700
- Scenario - Recon
- Hive Fleet Phage, Tyranid Army List played
by Michael J. Casavant]
- Cult of Pain, Chaos Space Marines: Emperor's
Children [played by Cliff Maxwell]
- Result - Massacre in favor of the Tyranids
- VPs for kills - Phage, 1677.5: Damaged Rhino only survivor,
so I only get half of its VPs, or 22.5.
- VPs for kills - Cult of Pain, 649.5: Spinegaunts 170,
Spinegaunts 170, Ripper Swarm 92, Lysogaunts 298/2 = 149,
Carnifex (2 wounds) 137/2 = 68.5
- Scenario Points
- VPs for getting in the zone - Phage, 1100: 200 HT&TG
unit, 200 HT, 200 Stealers, 200 Stealers, 100 Lysogaunts
(less than 1/2), 200 Carnifex.
- VPs for getting in the zone - Cult of Pain, 0.
- Grand Tournament Scale (Victory Points Difference) - N/A.
- 0-299 Victory Points = Draw - neither side holds the
upper hand.
- 300-599 Victory Points = Minor Victory - You have won
the battle, but only just!
- 600-1,199 Victory Points = Solid Victory - You have decisively
defeated your foe!
- 1,200+ Victory Points = Massacre - You have ruthlessly
crushed your foes!
Report
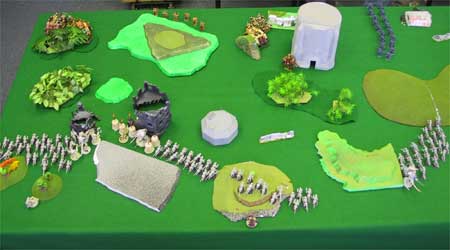
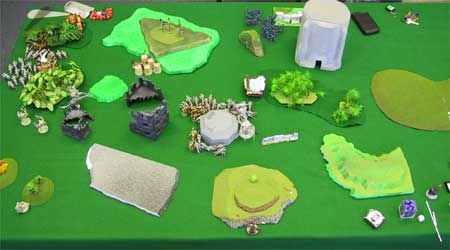
Setup
Naming convention: The food that have faced Hive Fleet Phage
have named the Hive Tyrants that continue to plague them. The
one that trudges forward implacably with an escort of Tyrant Guard
they call "Thunder." The swift winged beast that races
across the battlefield and shatters bodies and vehicles alike
has been dubbed "Lightning." They have also named the
Carnifex engine of destruction, "Mjolnir."
Choice of board edge went to the Cult of Pain (CoP).
Note: Recon allows Infiltrators to setup anywhere on the board
as long as you are not within 18" of an enemy unit. The Cult
of Pain was set up tightly enough that Hive Fleet Phage was able
to deploy his Genestealers in the Deployment zone of the Cult
of Pain.
The Battle
The bugs were hiding somewhere in the wastelands. Magnetic
storms prevented orbital surveillance, what little was still intact
and able to hide from the orbiting hive ships. Scourgemaster Rodaxus
sent a detachment of the Cult to look for the creatures. Many
volunteered for the chance to experience the harsh sweet pain
of battle. The vehicle drivers had to be locked in their compartments
to prevent them from bursting out to inflict and experience pain
in the grip of melee. The Dreadnought was dispatched, the poor
gibbering soul inside it had long ago forgotten its own name,
cut off as it was. Entombment in a Dreadnought was saved for only
the most vile of our kind and no cult member would wish such painful
isolation from the flesh.
[Note: that was fiction intended to reflect the Cult of Pain,
which is a group based on the Chaos Space Marines chapter known
as the Emperor's Children. They are a freaky, deviant group that
delights in sadomasochism, to put it simply. It's much more complicated
and twisted than that. I, personally, do not endorse such behavior;
I feel sorry for anyone that feels compelled to seek out pain
and I loathe anyone that finds pleasure in inflicting pain on
others. It's just a game, though, and the fluff is meant to give
the armies character. I play Tyranids, ravenous predators controlled
by a collective intelligence, yet I am not a Tyranid myself though.
I am, however, controlled by a single intelligence, my wife. :-)]
Choice of the first turn went to CoP. CoP chose to go first.
|
|
|
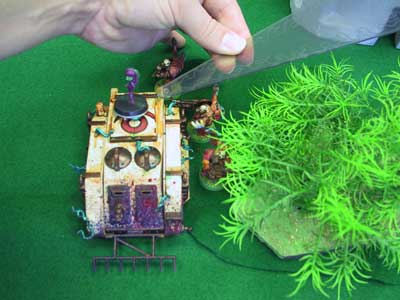
This is the most damage I have ever done
with a Bio-Acid mine. Sure, I then proceeded to scatter
most of them off the table and do nothing more than piss
off vehicles and kill a few possessed Marines, but this
one was remarkably effective. I can't remember exactly
what it killed, but it took out the Rhino and two Noise
Marines, which means it killed at least 125 points! I took
a picture, because I don't imagine this will happen again
anytime soon.
The numbers are pretty amazing. It had a 1/3 chance of
hitting, a 42% chance of glancing or penetrating, a 50%
of destroying the vehicle, a 1/3 chance of wounding each
trooper, and about a 1/6 chance of actually hitting two.
Something like this should happen about 0.001% of the time
(using these crude assumptions).
So the dice get all of the credit here.
|
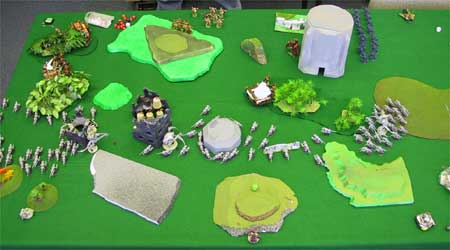 |
| Start of Turn 2. Rippers take some cover in the building,
which the Carnifex hides behind to deprive the Lascannons
of a target. The Hive Tyrants and Tyrant Guard do likewise.
Gaunts advance all around, the ones on the left jockeying
around to try and minimize the potential threat of flamer
template weapons such as the Noise Marine Doom Sirens. |
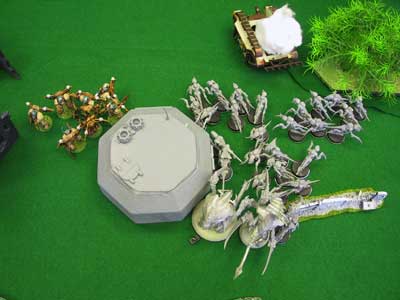 |
| This was pretty weird. The Lysogaunts, Carnifex, and Hive
Tyrant had all attacked the Noise Marines (not seen because
they are dead), which were already engaged with the Spinegaunts
(also dead). However, because the Raptors were fighting the
Spinegaunts and the Noise Marines were fighting the Spinegaunts,
that was a single close combat. Because the Lysogaunts, Carnifex,
and Hive Tyrant were all fighting a unit involved in this
combat, the remaining units on both sides, although not engaged
and not even within a Consolidate move of one another, were
forced to crush in to each other. It didn't feel right, but
it agrees with what the measly single paragraph on this situation
says. |
 |
The Gaunts firecely assault the Daemon Prince and remaining
noise Marines from the Rhino. :-)
Mjolnir, the Lysogaunts, and Lightning, tear into the Raptors
and Fleshcaster Rholgath.
Note: Unfortunately for Cliff, Rholgath joined the Raptors
right before they assaulted. While this allowed Rholgath to
get into Assault a turn earlier, it prevented the Raptors
from using their ability to withdraw from Close Combat, which
was a pain since the combat went on so long.
The Daemonettes and Possessed Chaos Marines tore the Rippers
to shreds, taking some casualties in return. |
Wrap-up
More Daemonettes came on and the Lysogaunts, Mjolnir, and Lightning
swept in and slaughtered them.
Cliff tapped out in turn 5 because he only had 4 Noise Marines
left (in Close Combat vs. Thunder and his unwounded Tyrant Guard);
a shaken, stunned, and weaponless Rhino; and another opponent
waiting for another battle.
I had a lot of great luck in general, although my Lysogaunts
seemed to only be competent at taking hits. The game got bogged
down by some rules discussions, but most of that stemmed from
my residual ignorance of some stuff. I will keep on trying!
Cliff's army has a great look to it. It inspires me to keep painting
my own pathetic horde of metal and plastic.
Lessons Learned
- Discuss terrain and its effects! There was some friction over
how the building worked. I really need to be more disciplined
about chatting about all terrain before the game starts.
Tactics Developed
- I finally got to try out deploying in the enemy's zone and
it was cool. I took a risk in that Cliff could simply ignore
the Stealers, which would give me a lot of VPs, but take a deadly
unit out of the fight. He did this essentially, only sending
the Dreadnought over. Would I do it again? Probably. It was
interesting and mixed things up.
Rules Questions & Clarifications
- Multiple units in close combat. I need to get this down for
sure in my head. In battle report #7, I was told the exact opposite
of what I thought, then in this battle I was told the exact
opposite of that. There is but one measly paragraph on it and
it seems pretty straightforward. The simplest approach is that
once you get into a close combat, you are there until the entire
other side dies or falls back. However, some silly examples
can occur like in this battle, where the remaining units were
never actually within close combat range of one another and
were forced to crush in. It's an abstraction and that's fine,
but I need to figure for sure what it is and how it is played
so that I am not surprised by it. Being surprised by a rule
is always unpleasant. Reading the main
rules, the Chapter Approved compilation, and both Assault Tactica
in the White Dwarf was of little help. The same geneic terms
were used. Basically, it comes down to two possible interpretations
for me. 1) One big fight, everyone's there until everyone is
dead or gone. 2) One big fight, but if a given unit's target
is dead and nothing else is within 2", then all opposing
models (for them) are dead and they have the same options as
winners. #2 requires more of a stretch based on the wording,
so #1 is probably best until further clarification is possible.
|