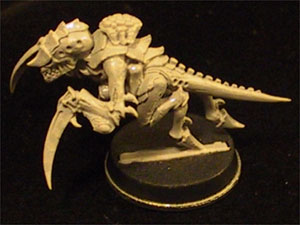
Assembly Notes: Gaunts
Use Pictures!
You should look up pictures of the model in the Tyranid Codex
as well as keep the box the model came in close by. The picture
on the cover of the box and the pictures in the Codex will
help guide you as to the intended posture and appearance,
which can be very helpful, even if you want to convert the
model.
Basic Guidelines
- Do not put the body into the slottabase until you are
happy that the flash is trimmed adequately. The pose of
the model will make it hard to trim the flash once it is
in the base.
- Do not accidentally mix up the arms unless you want
to convert them!
- Devourer - there all identical, go crazy!
- Fleshborer and Scything Talons - There are four pairs
of arms. You can tell them apart by the little elbow
spurs on them.
- Spinefists - You can pair these up as you see fit.
I personally like the look of little starfighters, so
I pair up most of mine with the same extension so the
guns are generally side by side.
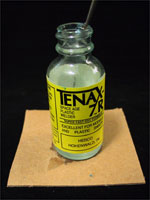
- I used polystyrene cement for all joining needs with this
model.
Materials
Procedure
- Make some of my Weeblanid
bases.
- Cut pieces from sprue.
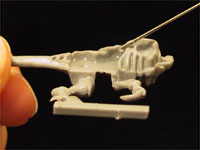
- Clean most of the flash off of the body halves with a
knife.
| Trim mold
lines and flash from long smooth surfaces where a
knife is easy to use. In places like this, Tenax may
do more harm than good by introducing disfiguring
brush marks. Note that I am dragging the blade at
about 75 degrees, not cutting into the material. I
use light quick strokes so as to err on the side of
removing too little flash rather than risking gouging
the material. Fresh, sharp blades are essential. Skip
knobby and hard to reach areas until you get to the
Tenax. |
 |
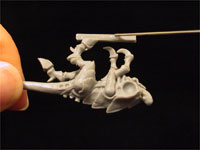
| WARNING:
YOU MUST HAVE ADULT SUPERVISION WHEN WORKING WITH
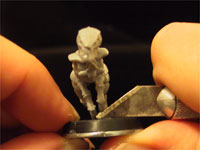
A KNIFE! Trim off heavy flash, such as where the piece(s)
connected to the sprue. Note that I have the base
and handle of the blade firmly pressed into my thumb
to constrain the knife to a short, slow, controlled
cut. DO NOT drag the knife along its edge in a slicing
motion, just press it in towards your thumb. If you
drag it along the blade surface in a slicing motion,
you will cut your thumb (and probably damage the model)! |
 |
- Assemble the body and head.
| Apply Faller
Plastic Cement to the body, completely wetting the
entire area that will be glued, including the back
surfaces (the area that glued is being applied to
in the picture at right). |
 |
| Glue the
two body halves together. With this particular gaunt,
there is a lot of empty space. I push the smaller
body half as far back as it can go because the tail
edge cannot be cleaned up easily later, whereas some
more plastic cement in the crevasse at the front shoulder
will fill it in nicely, especially if you have a wonderfully
high precision glue applicator like with (everyone
say it together) Faller Expert Plastic Cement. |
 |
| Apply a
thin line of glue to each side of the slot and insert
it into the slottabase. |
 |
| The model
is likely to be off center or leaning forward or backward.
I just lay the back edge of my ugliest Xacto knife
across the slot and base, forcing the slot to align
side-to-side, then smoothly scrape towards the front
to align the slot front to back. Note: this only works
if you make sure the slot is level or higher to begin
with. If the slot has already been pressed into the
base so that it is below the surface, then you will
need to pull it back up a little first. |
 |
- Use Tenax and a brush to clean up the remaining flash
on the body and head (there
is a page on this technique).
- Wait at least 15-30 minutes or so for the glue to cure
reasonably well. While you are waiting, you can move on
to step #7.
- Now it's time to clean up the arms. As before, you can
clean most of the flash off arms with knife.
- Glue arms into the body. You should glue both arms in
at the same time so that you can get a good pose.
- Again, use Tenax to clean off the remainder of the flash.
- I then look at the model and look for spots to apply some
extra Faller plastic cement to fill gaps. Under the head,
at the arm/shoulder joint and at the front leg of the body
joints are common spots where a gap might show up.
- If this is the same night that you started, I would put
the models away for the night and wait until the next day
so that the glue can thoroughly cure and you can safely
handle the models.
- Clean models with soap and water, dry them, and start
painting!
* - focus on heavy flash and easily reached mold lines. Difficult
areas and/or creases at joints will be handled later with
Tenax.
Lysogaunts - Adding Biomorph #1, Adrenal Gland
This is on a separate page about adding Adrenal
Gland Biomorphs.
Lysogaunts - Adding Biomorph #2, Toxin Sacs
This is on a separate page about adding Toxin
Sac Biomorphs.
|