|
People gotta eat. Farms make food. Occasionally a battle is going to
happen in a rural area. So let's build some farm stuff! Here I show how
to make some hills from some simple and cheap (mostly free) materials.
These pieces are designed with two uses in mind: as props for role-playing
games and terrain for miniatures warfare games, such as Games Workshop's
Sci-Fi minis game, Warhammer 40,000 (WH40k), and their Fantasy minis
game, Warhammer.
WARNING: You should not attempt these procedures without an adult present.
Farmhouse and Barn
This was a group effort in which I mostly just offered advice and provided
supplies, so I will get down as much as I can. Cliff started the buildings
and then fled the terrain making authorities. Laura and Chris came in
to finish the buildings and save the day. These were built while hanging
out and chatting, so they probably took longer than necessary, but for
what it's worth the buildings took about 5 or 6 hours of work each at
our leisurely pace.
Materials
- White glue (a.k.a. PVA glue, a.k.a. Elmer's Glue) and/or Elmer's
Craft Bond (spray glue)
- Aleene's Original Tacky Glue
- Wood shavings (from whittled skewers used for a palisade)
- Small fake fern pieces
- Large paint brush (1" wide head)
- Rustoleum Red Primer
- texture paint (Behr Premium Plus, Sand Finish)
- Craft paints (for highlighting and small stuff)
- Delta Ceramcoat Mendocino Red
- Delta Ceramcoat Toffee Brown
|
Procedure
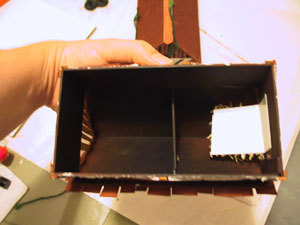
1. Cliff started both buildings. Start with a strip of matte
board 2" wide and 18" long. Score and fold it at 3",
9", and 12". Fold and glue it together into an open box.
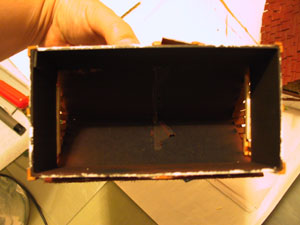
2. Take another piece of matte board 6" x 6.5". Cut
down the center along the axis fo the 6.5" length and fold.
That should leave you with a roof 6.5" long and folded down
the center. If you wish, you can cut a triangle to support the
center of the roof. This was not necessary as one building was
done with a support and the other without.
|
|
|
| With triangle support in center. |
No triangle support (just glued in
place at edges). |
3. Planks were created as follows: Popsicle sticks were clipped
flat at the ends, a cut was started at one end and then the sticks
were split down the middle. This produced two rough-looking wood
pieces which could then be trimmed and cut as needed. Planks were
used on both buildings to create the appearance of a lumber superstructure.
Then Laura and Chris took over to finish the buildings.
 |
|
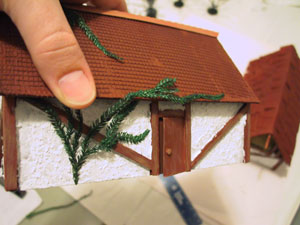
| Laura planked up the gap under the
roof for the farmhouse. She got crafty, using small fake
fern pieces to create an ivy-like effect. |
Chris was making the barn so he crafted
a beam sticking out from a hay loft. We had some wood shavings
left over from a wooden palisade which made believable hay. |
4. Roofing illusions of tile were created in two ways.
 |
|
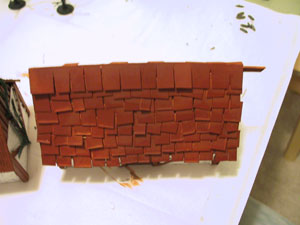
| Chris chopped up card into individual
tiles and glued them down. |
With Laura's we went for an even more
subtle illusion, using a mesh-like cloth* that she glued
down. Unless you get extremely close, it looks like the outline
of tile edges. A very nice illusion. |
* - fabric swag, a serendipitous find during my many wanderings;
this is why you should wander around craft stores and fabric stores
looking for potentially useful things. At least that's what I keep
telling myself. :)
4. Doors. Chris glued a circle of wood onto the door for a door
knob. Laura went a step further and made an ajar door.
5. The whole model was spray painted with Rustoleum Red Primer.
This gave it a wooden color overall. Texture paint was then painted
in the "plaster" areas, giving, well, a plaster effect.
Some highlights were made with Delta Ceramcoat Mendocino Red. A
top piece on the farmhouse, running the length of the roof, was
painted with Delta Ceramcoat Toffee Brown.
6. Everything was then sealed.
|
|


