Assembly Notes: Hive Tyrant
I used pins, 5-minute epoxy*, and superglue for the assembly,
following the same basic procedure as for a standard
hive tyrant assembly using pins and putty.
* - I originally tried only pins and superglue, but the heavy
load-bearing joint failed repeatedly, so I switched to 5-minute
epoxy for most of the joints.
Basic Assembly Comments
- I used pins and 5-minute epoxy for assembly of the body
and base. For the arms I used cyanoacrylate glue because I
wanted to be able to brek the joint and reposition the arms
as desired.
- I made posed the tail higher to give more of a lunging
action pose. This created an unsightly gap at the left hip
joint, but I fixed that ultimately with putty.
- Outline
- Pin legs and pelvis
- Join legs, pelvis and washer base
- Join torso and head
- Pin arms
- Decide on final angle of torso and arms (you really
need to do both at the same time)
- Glue torso in place
- Glue arms in place
- The arms were a problem because I used four Monstrous
Scything Talons. I ended up sweeping two back and two forward,
making it look like two melded monsters. It gives a weird
look that I think underscores an alien mind working the
limbs.
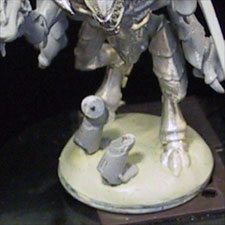
Making a Cool Base
Unfortunately there is not a lot of room, but because this
is my close combat death machine, I decided dismembered marine
was the only way to go. So I cut some legs off a Marine model
and put some pins in to serve as bits of protruding bone.
I pinned the feet, put putty on the base, inserted the feet.
Played with the putty some more and voila!
Attaching Biomorph #1 - Extended Carapace
This was a hard decision. I could not find anywhere that
looked good and I also had to keep in mind that I wanted to
eventually add wings. Then it hit me. I don't really like
the knobs all that much...
So I cut off the knobs on the back and put on some plates.
The details are on my Conversions - Extended
Carapace page.
Attaching Biomorph #2 - Adrenal Gland
I decided to stick these between some plates of the Extended
Carapace beforehand. There are great reasons for this, not
the least of which is that plastic to plastic can be melted/joined
with plastic cement to give a more organic-looking joint.
So I cut off the knobs on the back and put on some plates.
The details are on my Conversions - Adrenal
Gland page.
Attaching the Wings
I did this after painting the
model.
|