Battle Report 14 - Fall of Firebase Theta
Tyranids vs. Chaos Space Marines
Composed by Michael J. Casavant (Hive Fleet Phage)
Summary
- Date - 13JAN2002
- Points - 1500
- Scenario - Strongpoint Attack
- Hive Fleet Phage, Tyranid Army List played
by Michael J. Casavant]
- Chaos Space Marines (Undivided) [played
by Lars Ericson]
- Result - Massacre in favor of Tyranids
- Losses, Phage (378 total) - Lightning 1/2 strength (100),
Genestealers dead (112), Gargoyles 1/2 strength (45), Spinegaunt
one brood 1/2 strength (65), one Biovore (56).
- Losses, Chaos Space Marines (1630 total) - All dead except
for one Rhino (70).
- Bonus - +200 to Tyranids for occupying bunker at end of
game.
- Grand Tournament Scale (Victory Points Difference) - 1452
in Tyranids favor = Massacre.
- 0-299 Victory Points = Draw - neither side holds the
upper hand.
- 300-599 Victory Points = Minor Victory - You have won
the battle, but only just!
- 600-1,199 Victory Points = Solid Victory - You have decisively
defeated your foe!
- 1,200+ Victory Points = Massacre - You have ruthlessly
crushed your foes!
Report
Intro
This was my second experience with going with the basic scenario
setup in the book. I won the die toss for Scenario type, but I
let my opponent, Lars, choose because he was bored with Standard
missions. He selected Raid. I won the die toss for choosing Attacker
or Defender and I chose Attacker.
Setup
Naming convention: The food that have faced Hive Fleet Phage
have named the Hive Tyrants that continue to plague them. The
one that trudges forward implacably with an escort of Tyrant Guard
they call "Thunder." The swift winged beast that races
across the battlefield and shatters bodies and vehicles alike
has been dubbed "Lightning." They have also named the
Carnifex engine of destruction, "Mjolnir."
There were only two useful pieces that blocked LOS, the large
buildings/woods, and only one was useful to me. However, this
mission did not involve a lot of advancing over large stretches
of ground, so I did not mind so much.
The Battle
|
|
|
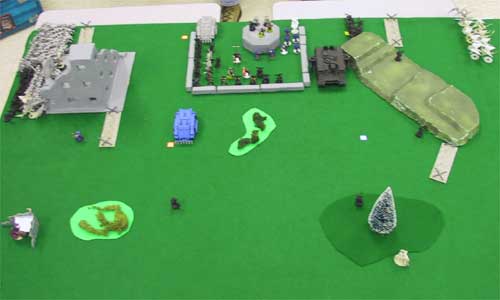
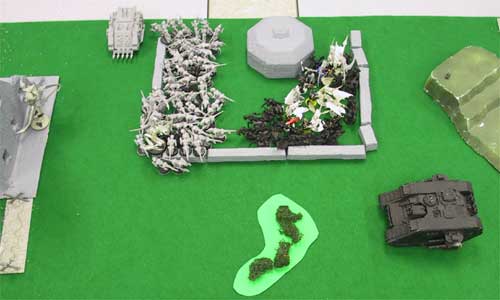
Initial setup - I went with both side flanks. There is
a sentry in the building that is not visible in this picture.
I resisted the urge to attack immediately (bad idea), and
tried to sneak in, realizing that I would have to be very
lucky not raise the alarm when I killed three sentries.
I tried nonetheless, but failed. :b
|
|
|
|
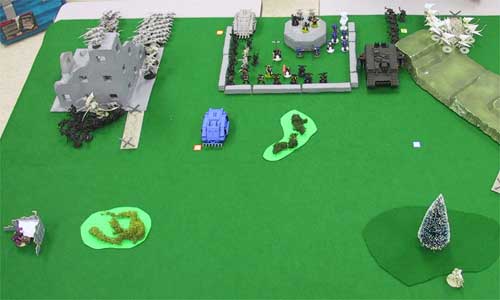
The sentries are dead and the alarm is raised. Amusingly,
the Red Terror managed to swallow a sentry whole.
|
|
|
|
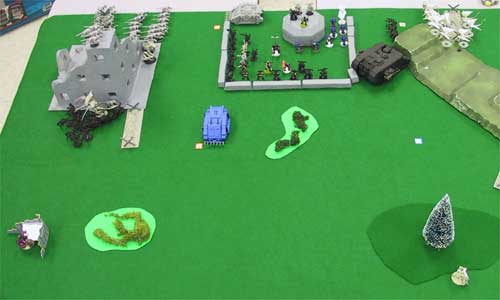
End Marine turn 1 - Shooting. A lot of firepower came screaming
at Lightning, but he sucked it up like the bad bug he is.
Oh sure, taking cover behind the hill didn't hurt either.
|
|

|
|
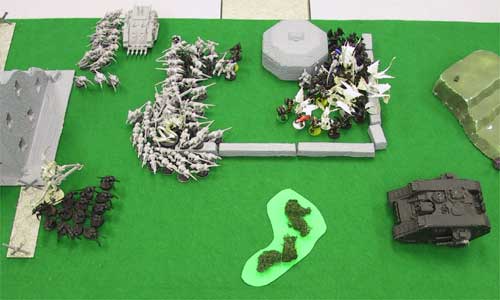
Tyranid turn 1 - So I ran on in there. Notice that I attacked
first with Spinegaunts. This was to get the close combat
going so my Leapers did not have to suffer the loss of initiative
attacking into cover in the first round of a combat. I also
attacked with the Red Terror (can't kill him as fast) and
the Warriors (Flesh Hooks). On the other side, I managed
to get the surviving trio of Genestealers around the wall,
and then attacked into cover with Lightning. I was a bit
crafty and bypassed the obvious target to assault the forward
unit of Chaos Marines; this nullified their advantage of
being behind cover, and pulled them away from the wall for
the imminent assault of the Lysogaunts next turn.
Note: The Red Terror only has three wounds and a 3+ save,
so getting him into Assault fast was very important.
Thunder and the Biovores fail to damage anything, those
slackers.
|
|
|
|
Marine turn 2 - The Possessed Chaos Space Marines come
on. They have the special powers of Invulnerable (that makes
their 3+ save Invulnerable!) and Fast (12" move). They
pounce on Lightning with dreams of dropping him while he
fruitlessly wails away at their invulnerable hides.
|
|
|
|
Tyranid turn 2 - Numerous gaps left by dying Spinegaunts
afford an opportunity for the Lysogaunts to jump in the
fray.
Thunder and the Biovores fail to damage anything.
|
Thunder asssaults the Rhino. The other Rhino, chases down and
kills a Biovore. The Assaults end with only the Tyranids still
alive.
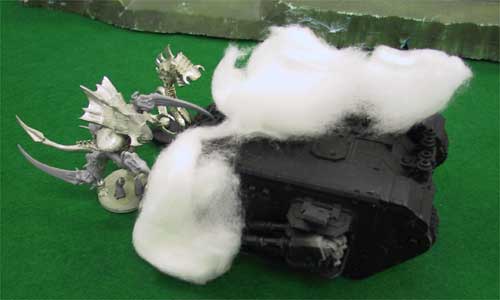
The Red Terror and Lightning go after the Land Raider Crusader...
|
|
|
Lightning and the Red Terror, devour the Machine Spirit!
This is actually the first time I have had to face a Land
Raider.
|
|

|
|
Yeah! Who's bunker is it now?
|
Wrap-up
So in the end, only the Rhino that went Biovore-hunting survived.
I got +200 bonus VPs for occupying the bunker.
There were a number of pivotal points in the battle. I guessed
right at a lot of critical junctures and the dice backed me up
too. Lars's Possessed Chaos Space Marines had really bad
luck!
Lessons Learned (and relearned)
- I need to check on the rules about moving over dead vehicles.
I would think infantry could just treat them as Difficult Terrain.
- A trio of mixed Warriors can be very handy. Recall that if
one of the Hand-to-Hand Warriors chooses to detonate Spore Mines
it does not affect the shooting of the rest of the unit. I also
felt a lot more comfortable that my Synapse would be solid throughout
the game.
Tactics Developed
- I practiced careful removal of Casualties to facilitate followup
assaults and crushing in by other models/units.
- In the setup shown I was able to assault a unit from behind
and negate it's cover by ignoring a closer unit that was a more
obvious target. This prevented two assaults from going through
cover.
- Catalyst was OK, but not amazing.
- For 1 point, it's worth putting the Flesh Hooks on Warriors.
It helps make them into a Tyranid Commando of sorts.
Rules Questions & Clarifications
- A telephone call to GW confirmed that infantry should be able
to move over a dead vehicle as though it were Difficult Terrain.
Also, vehicles treat dead vehicles as impassable terrain.
|
