Hive Tyrant (Wings)
Finally! I have painted and given wings to my flying Hive
Tyrant, "Lightning".
Materials
- Hive Tyrant
- Paint Brushes
- For painting, Winsor & Newton Number 1 and Number
2
- For applying white glue to base, Number 4 Sable
- For brushing off excess sand, a stiff small nylon
brush
- Basing materials
- Fine sand
- Elmer's white glue
- Wing materials
- Sealed dragonfly wings (details
on this page)
- Elmer's Craft Bond rubber cement
- Fine snips (the finer the better)
- Paints
- Primer - Citadel Colour Black Primer
- Basecoat - Citadel Colour Dark Angels Green
- Purple shades - Delta Ceramcoat (DC) Eggplant, Wisteria,
and Lilac Dusk
- Green shades - DC Black Green, Dark Foliage Green,
Medium Foliage Green
- Orange shades - DC Pumpkin, Yellow
- Yellow shades - DC Yellow, Bright Yellow
- Sand shades - DC Mudston, Sandstone, Antique White
- Red shades - DC Mendocino Red, Bright Red, Tangerine
- Bronze - Citadel Colour (CC) Dwarf Bronze
- Dirty wash - CC Chestnut Ink
- Bloody stump shades - DC AC Flesh, Black Cherry,
and White
- Folk Art Glass & Tile Medium
Procedure
Starting with an assembled and pinned model (details
here)...
1. Spray praint with CC Black Primer
2. Spray paint with CC Dark Angels Green
3. Separate into upper (head), middle (torso and limbs),
and lower (legs, pelvis, tail, and base).
4. Touch up missed green spots with Black Green, mixed
with Folk Art Glass & Tile Medium.
5. Paint purple regions. I did this portion as follows,
mix paint and water 4:1, e.g. 16 drops of paint and 4 drops
of water. I then used the stop sign approach to shading,
using DC Eggplant, Wisteria, and Lilac Dusk, and the intermediate
shades.
 |
| Here he is with just the Eggplant coat on the skin. |
6. I rushed a bit and this approach resulted in harsher
shade transitions. This was also related to the drying time
of the paint. I washed with a 1:3 paint:water mixture of
Eggplant twice before taking the edge off the transitions.
I found a single wash of 1:2 paint:water worked fine for
another portion. Remember, you can always wash again, so
starting more dilute than you think you will need is safest.
7. Now onto the green. For this once I wanted to try out
a modification on a more advanced technique I had read about,
wet on wet blending. I used a ratio of 8:2:1 paint:water:glycerine.
This dried slowly and I was able to return to portions and
add the next shade before the first shade had dried completely.
This resulted in remarkably smooth transitions. I used DC
Black Green, Dark Foliage Green, Medium Foliage Green and
the intermediate shades between.
8. With the flesh and chitin painted, I moved onto the
orange markings. I used 8:2:1 paint:water:glycerine again.
I painted with numerous tiny short strokes painting perpendicular
to the plate edge. This produced a rough, feathery edge
to the markings. I went over the markings three times with
DC Pumpkin, then highlihted with 1:1 Pumpkin:Yellow and
finally a touch of Yellow.
9. Finally, I painted the marine leg armor stumps. I went
with red colors in honor of the Red Talons, a custom Iron
Hands chapter my friend plays. I used DC Mendocino Red,
Bright Red, Tangerine, and the intermediate shades. I painted
this a little sloppy and it ended up looking a little dirty
and worn, which was nice.
10. There are small strips of ribbing on the outer thighs
and inner and outer arms. I painted these with DC Yellow
and highlighted with Bright Yellow. Be careful.
11. Bronze! I stippled all of the chitin with CC Dwarf
Bronze. Tedious, but a nice effect in the end. I also did
some straightforward drybrushing on the talons and the biomorphs
(toxin sacs and adrenal gland). The teeth and eyes were
given heavier bronze coats.
12. The marine legs have a Terminator Honor, which is a
little object like a prize ribbon. I highlighted the round
seal part with DC Pumpkin. The ribbon parts were painted
DC White and washed with CC Chestnut Ink to make it look
dirty.
13. Stumps! I originally made the legs with two short pins
sticking out of them, to be remnant bone. I pressed two
small balls of putty onto the pins and shaped them so that
a tiny portion of pin still protruded and the putty looked
like passable gobbets of flesh. I painted the blobs DC AC
Flesh, then painted the protruding pin pieces DC White.
Finally, I painted DC Black Cherry around the bone bits
to simulate savaged muscle and sinew.
 |
| Yes, it's a little stark, but it's a pretty small
detail in real life and I worried that a wash to mimic
blood would obscure the gory detail. (and yes, I took
this picture at the end) |
14. The model was assembled. There was a little gap at
the pelvis/torso joint, so I pushed a small ball of putty
onto the pin, pressed the pieces together, and shaped the
putty. I then pulled the pieces apart, applied 5-minute
epoxy to both sides of the putty and pin, then put them
back together, shaping the putty as needed until the putty
and glue cured. I then painted the strip of putty with multiple
coats of DC Eggplant.
15. Basing! I painted on dilute Elmer's glue,1:1 glue:water.
I dipped the base in sand, waited for it to dry, then repeated.
16. Once dry, the sand was painted with liberal amounts
of DC Mudstone 1:1 water:paint. After a short period of
drying, it was highlighted with DC Sandstone and then Antique
White.
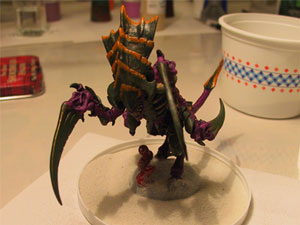
17. The model was sealed with my
usual approach.
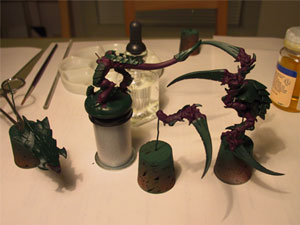
18. Finally, the wings. This was the nerve wracking part.
I finally decided to clip them from their carapace and glue
them in place with rubber cement. I think this is crucial
for long term wear, because the rubber cement will give
without tearing the wings to shreds and the wings are light
enough that rubber cement is adequate. Note in the picture
below that I used whatever was handy to support the wings
while the glue cured.
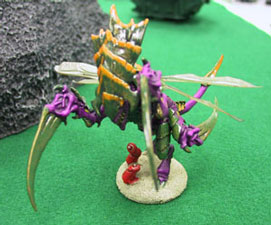
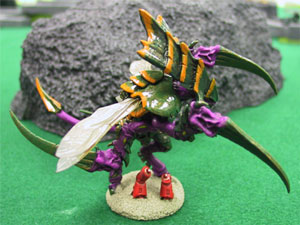
And here he is on the battlefield!
|