Battle Report 12 - Planetfall (or Food That Delivers Itself)
Tyranids vs. Space Marines (Iron Hands)
Battle #1 in Lars
Ericson's Rescue of Warsaw II ladder campaign.
Composed by Michael J. Casavant (Hive Fleet Phage)
Summary
- Date - 04NOV2001
- Points - 1500
- Scenario - Cleanse
- Hive Fleet Phage, Tyranid Army List played
by Michael J. Casavant]
- Red Talons Chapter - Iron Hands Space Marines
[played by Lars Ericson]
- Result - Victory for Tyranids
- Quarters game - Tyranid held 2 quarters, other 2 contested,
so 2-0. Tyranids victory.
- Losses - Phage: 1/2 Genestealer brood, Lysogaunt brood,
both Spinegaunt broods, 1/2 Gargoyle brood, Ripper Swarm
brood.
- Losses - Red Talons: 3 Land Speeder Units, Razorback,
Rhino, 1/2 Tac Marine squad x 2 and 1 full Tac marine squad,
Predator Annihilator.
- Grand Tournament Scale (Victory Points Difference) - N/A.
- 0-299 Victory Points = Draw - neither side holds the
upper hand.
- 300-599 Victory Points = Minor Victory - You have won
the battle, but only just!
- 600-1,199 Victory Points = Solid Victory - You have decisively
defeated your foe!
- 1,200+ Victory Points = Massacre - You have ruthlessly
crushed your foes!
Report
Intro
This is the first battle of what is supposed to be a ladder campaign
that Lars has set up.
Setup
Naming convention: The food that have faced Hive Fleet Phage
have named the Hive Tyrants that continue to plague them. The
one that trudges forward implacably with an escort of Tyrant Guard
they call "Thunder." The swift winged beast that races
across the battlefield and shatters bodies and vehicles alike
has been dubbed "Lightning." They have also named the
Carnifex engine of destruction, "Mjolnir."
I am numbering the quarters like a graph in math class. The top
right is #1, #2 is top left, and so on, counterclockwise. Choice
of quarter went to the Tyranids. None of the quarters was really
ideal, so I simply chose a quarter with decent cover that deprived
Lars of a rooftop perch for any of his guys.
We chose the buildings to work like woods normally do. [Using
Cityfight rules instead may sound reasonable, but Cityfight rules
were designed to make a game playable in, well, a city fight,
and they don't translate well outside of that milieu.]
The Battle
The terrain layout was challenging. Virtually no useful cover
in the middle, and the small amount of "forest" was
pushed back far enough that I had to cover at least 24-30"
in a straight run to engage the food; that meant three to four
rounds of getting shot even for my fastest units, which I did
not have enough of to survive. It was indeed going to be challenging.
As for the marines, that low wall near the union of two quarters
was a great position for some mechanized infantry to set up in,
so I would have to keep an eye on that.
What was the plan? The wall was too obvious a salient for the
marines, not to mention the fact that it was just inside a second
quarter, so if I let it go unchallenged, it could lose the game
for me. The plan was to hook around to have a huge melee ensue
at the wall and secure quarter #1, using my Carnifex to charge
in last minute and capture a third quarter, #3. I had no intention
of trying to take the marine's home quarter (#2), but I might
try to contest it. I was pretty confident that Thunder and his
Tyrant Guard could keep my home quarter, #4, supported by Mjolnir
if necessary.
Some wrinkles were present, aside from the fact that Lars is
shrewd and has about a decade on me when it comes to playing this
game. At the very least, Lars will make me pay for any mistakes
I make. I was facing an army with 5 Troop choices, 7 non-Troop
choices, and 2 transport upgrades (move 12"); three of these
choices were single Speeder units (move 24") and two more
were a Whirlwind and Annihilator (move 12"). I only had 9
units capable of capturing quarters and only two of them had faster
than a 6" Move. I was uncomfortably outnumbered in quarter
capturing capability and maneuverability, so I had to take down
the vehicles as fast as possible to keep a lid on last minute
quarter bids (wow, sounds like I actually know what I am talking
about...nah can't be). On top of that were the seven Lascannons
in Lars' army, one of them twin-linked and four of them backed
up by a Signum (re-roll one miss), so I had to decide to keep
behind cover or try and overwhelm the guns with too many targets.
Because it was a quarter capturing mission, I decided to err on
the side of keeping my monsters alive; this is hard for me to
do, because it involves not running across the field and asaulting
everything I can, which is what I want to do. The Hive Mind is
smarter than that...
|

|
|
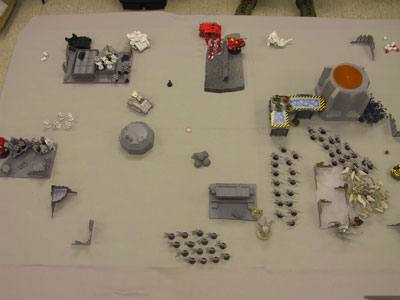
Turn 1, second half, mid-shooting Tyranid Shooting. The
Gaunts and Rippers are moving directly to the low wall.
The Carnifex and Lysogaunts are advancing to quarter #3.
The Biovores have managed to take out the Annihilator. Lars
has raced on over to quarter #3, so I need to pay attention...
- Quarter #1 - Contested
- Quarter #2 - Marines
- Quarter #3 - Marines
- Quarter #4 - Tyranids
|
|
|
|
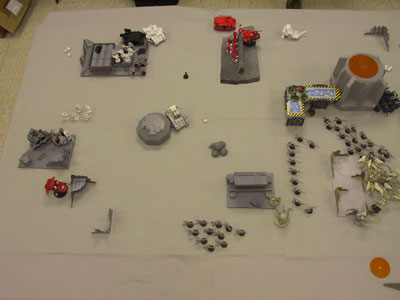
End of turn 1.
- Quarter #1 - Contested
- Quarter #2 - Marines
- Quarter #3 - Marines
- Quarter #4 - Tyranids
|
|
|
|
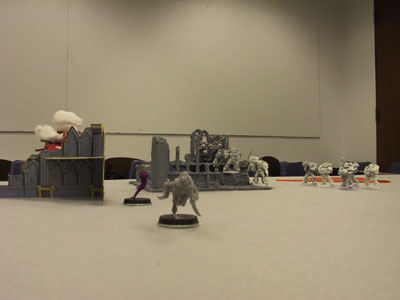
Midpoint of turn 2. See the big holes the Marines made?
Ouch. :-P
|
|

|
|
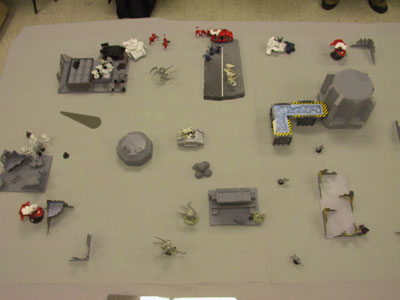
End of turn 2. The Gaunts and Rippers are still moving
directly to the low wall. The Carnifex and Lysogaunts are
still advancing to quarter #3. The Gargoyles and Lightning
work on getting behind the tower. The Genestealers are already
hunkered down behind the tower, waiting for the Hive Mind
to speak to them...
- Quarter #1 - Contested
- Quarter #2 - Marines
- Quarter #3 - Contested
- Quarter #4 - Tyranids
|
|

|
|
Middle of turn 3. The Marines continue to chew up my guys.
The Lascannons are not being given any monsters to shoot
at, so they take out their rage on my poor Ripper Swarms.
|
|

|
|
End of turn 3. Finally, a melee ensues! With that screen
in place, the Genestealers move out and kill the Speeder
without blowing it up and getting killed in the process.
Thank goodness it moved more than 6" and forced a glancing
blow instead of penetrating. The Gargoyles and Winged Tyrant
are staging behind the tower, ready to zoom out behind the
melee. The Lysogaunts continue their suicidal charge, just
missing the mark and setting themselves up to get gunned
down next turn. The Carnifex finishes off a Land Speeder
and spore mines rain down somewhat ineffectually.
- Quarter #1 - Contested
- Quarter #2 - Marines
- Quarter #3 - Contested
- Quarter #4 - Tyranids
|
|
|
|
Mommy!
The sole remaining Lysogaunt flees, hoping that the nasty,
stinging food will find better targets to shoot.
This was probably the midpoint of Turn 4, after the Marine
shooting phase.
Elsewhere on the board, the Gargoyles and Winged Tyrant
approach the melee at the wall. One brood of GS hunker down
behind a fallen skimmer while the other, smaller brood continues
forward to join the melee.
- Quarter #1 - Contested
- Quarter #2 - Marines
- Quarter #3 - Marines
- Quarter #4 - Tyranids
|
|
Turn 5 (no picture) Saw more stuff shot up, but not as
efficiently as before. The unpainted Biovore has been avoiding
getting killed by a Heavy Bolter for about 3 turns now.
:-) The Winged Tyrant and Gargoyles make it to the melee,
but the smaller brood of Genestealers falls short.
- Quarter #1 - Tyranids
- Quarter #2 - Marines
- Quarter #3 - Marines
- Quarter #4 - Tyranids
|
|
Turn 6 (no picture) This was pretty dramatic. The small
brood of 3 Genestealers make it to the melee and help the
Gargoyles finish off the last three normal troopers. Lightning
kills Sergeant Mustafa Jackson three times over. That leaves
the bugs in the melee victorious, so Lightning sweeps towards
the Marine's home quarter. Elsewhere, Mjolnir advances into
Quarter 3. This contests both of the Marine quarters, leaving
the Hive victorious! With their drop point unsecured, the
Marines will have a harder time rescuing Warsaw II.
- Quarter #1 - Tyranids
- Quarter #2 - Contested
- Quarter #3 - Contested
- Quarter #4 - Tyranids
|
|
|
|
End of game.
- Quarter #1 - Tyranids
- Quarter #2 - Contested
- Quarter #3 - Contested
- Quarter #4 - Tyranids
|
Wrap-up
Wow, that was a toughie. If that last Ripper had died one round
earlier...if that Lascannon squad had one extra round of productive
fire...all in all, a well fought game.
Lessons Learned (and relearned)
- Paying attention to Victory Conditions is very good. I will
probably say this another half dozen times in future reports.
From the very start, I was thinking in terms of victory conditions
instead of just running up to kill Marines.
- Transports can be surprisingly useful for marines. For example,
the first deployment of the game was Lars placing a Devastator
squad deep in his quarter, under cover, and their transport
upgrade, a Razorback, at the far front corner to push back my
army. It allows one to place an expensive long range unit far
away and simultaneously use a cheap, disposable vehicle to push
me back, with a single unit deployment. Wow. Add to that
the advantage of allowing a transport to capture or contest
a quarter on its own. Yipes. I need to get used to it and learn
to deal with it. It will be nice when I make my own mechanized
units of marines. :)
- Army composition rules are good.
Tactics Developed
- Deny your enemy the shot they want - I decided to completely
hide my monsters from Lascannon fire. All three of them are
tough, deadly, and can capture quarters. So I carefully kept
them out of LOS of the Lascannons while picking off everything
else in the army. Lascannons are not quite so cool when they
are forced to shoot Gaunts.
- Stay flexible - keep units positioned so that they have more
than one quarter they are capable of capturing. Always keep
in mind that simply surviving to capture a quarter can mean
victory.
- Pay attention to reducing as many squads as possible to 50%
or less rather than decimating only a few. It's a quarter capturing
mission.
Rules Questions & Clarifications
- Lars wondered if his Skimmer should be able to pass over a
friendly vehicle. I said yes for our battle, so it didn't matter,
but it is a valid query, vehicles are treated differently in
many regards.
|
